15 Minute Yoga Sequence for Desk Fatigue

yoga-sequence-desk-fatigue

Do you ever leave the office feeling utterly exhausted? After sitting for 8+ hours and staring at your computer screen, you know that you should get some movement and head to the gym or catch a yoga class. But instead you instead find yourself at home – and completely spent.

According to Healthyway, some of the ways ways in which your office job can leave you feeling tired include lack of light, lack of fresh air, and lack of movement. Take this a step further, and think about the effect that a desk job has on your overall posture. Many office jobs will encourage sore wrists, tight forearms, neck strain, shoulder issues, and aching hips. We need to offset these habitual strains with movements that help to counteract these effects. (Sorry gym buffs, it’s not more squats for your already over-taxed hips!)

While adding a structured, lengthy, or intense workout after a long workday might not feel attainable (let alone possible with scheduling demands), carving out just 15 minutes for this yoga sequence that will help combat your desk fatigue from your work day.

It’s important to make time to help re-energize and refresh your body and mind after a long day at the office. This 15-minute yoga sequence for desk fatigue will help stretch your hips, open up your front body, bring length to your spine, and give you the opportunity to slow your thinking brain down. Pro tip: like any new routine, set yourself up for success; set a reminder or an alarm and leave your mat out where you can see it to help you make it happen.

Heart Opener On Blocks

Heart Opener On Block
  • Take two yoga blocks, place one in the middle of your mat, so that your spine can rest along the block. Place the other block on it’s tallest height and rest the back of your head on it. You can keep your knees bent or take your legs long (as long as your low back doesn’t feel strained).
  • Let your arms stretch out and relax your fingers. It can take a few breaths to get settled into this posture.
  • Stay here for 10 breaths.
  • When you are done, slowly roll off the blocks onto one side and take a few breaths.

Cat/Cow

  • Move to your hands and knees, and come to a table-top position. Stack your hips over your knees and your shoulders over your wrists.
  • Move through 3 rounds of cow / cat. Notice the movement through your spine, as well as how it feels to open through your chest and stretch through your back body.

Easy Seat With Forward Fold

  • Come to a seat with your legs crossed. Sit up tall, and then fold over your legs. Walk your arms out in front of you while you send your sitting bones and hips towards the space behind you.
  • When your left shin is in front, walk your hands over to the right to stretch through your left side body. When your right shin is in front, walk your hands over to the left to stretch through your right side body.

Repeat the seated froward fold and side stretch on the other side.

  • Come back to centre, sit up tall and shrug your shoulders up to your ears. Roll your shoulders back and down. Repeat 5 times.

Neck Stretch

  • Bring your chin to your chest to find a gentle stretch through the back of your neck.
  • Nod your head over to the left to find a stretch through the right side of your neck.
  • Come through centre and then nod your head over to the right to find a stretch through the left side of your neck.
  • Do this 3 times on each side.
  • Come back to centre and lift your head so you are looking straight ahead.

Downward Facing Dog

  • Move to your hands and knees and come into Downward Facing Dog. Feel free to “walk your dog”, move through your hips, whatever movements feel good. Stay here for 5 full breaths.
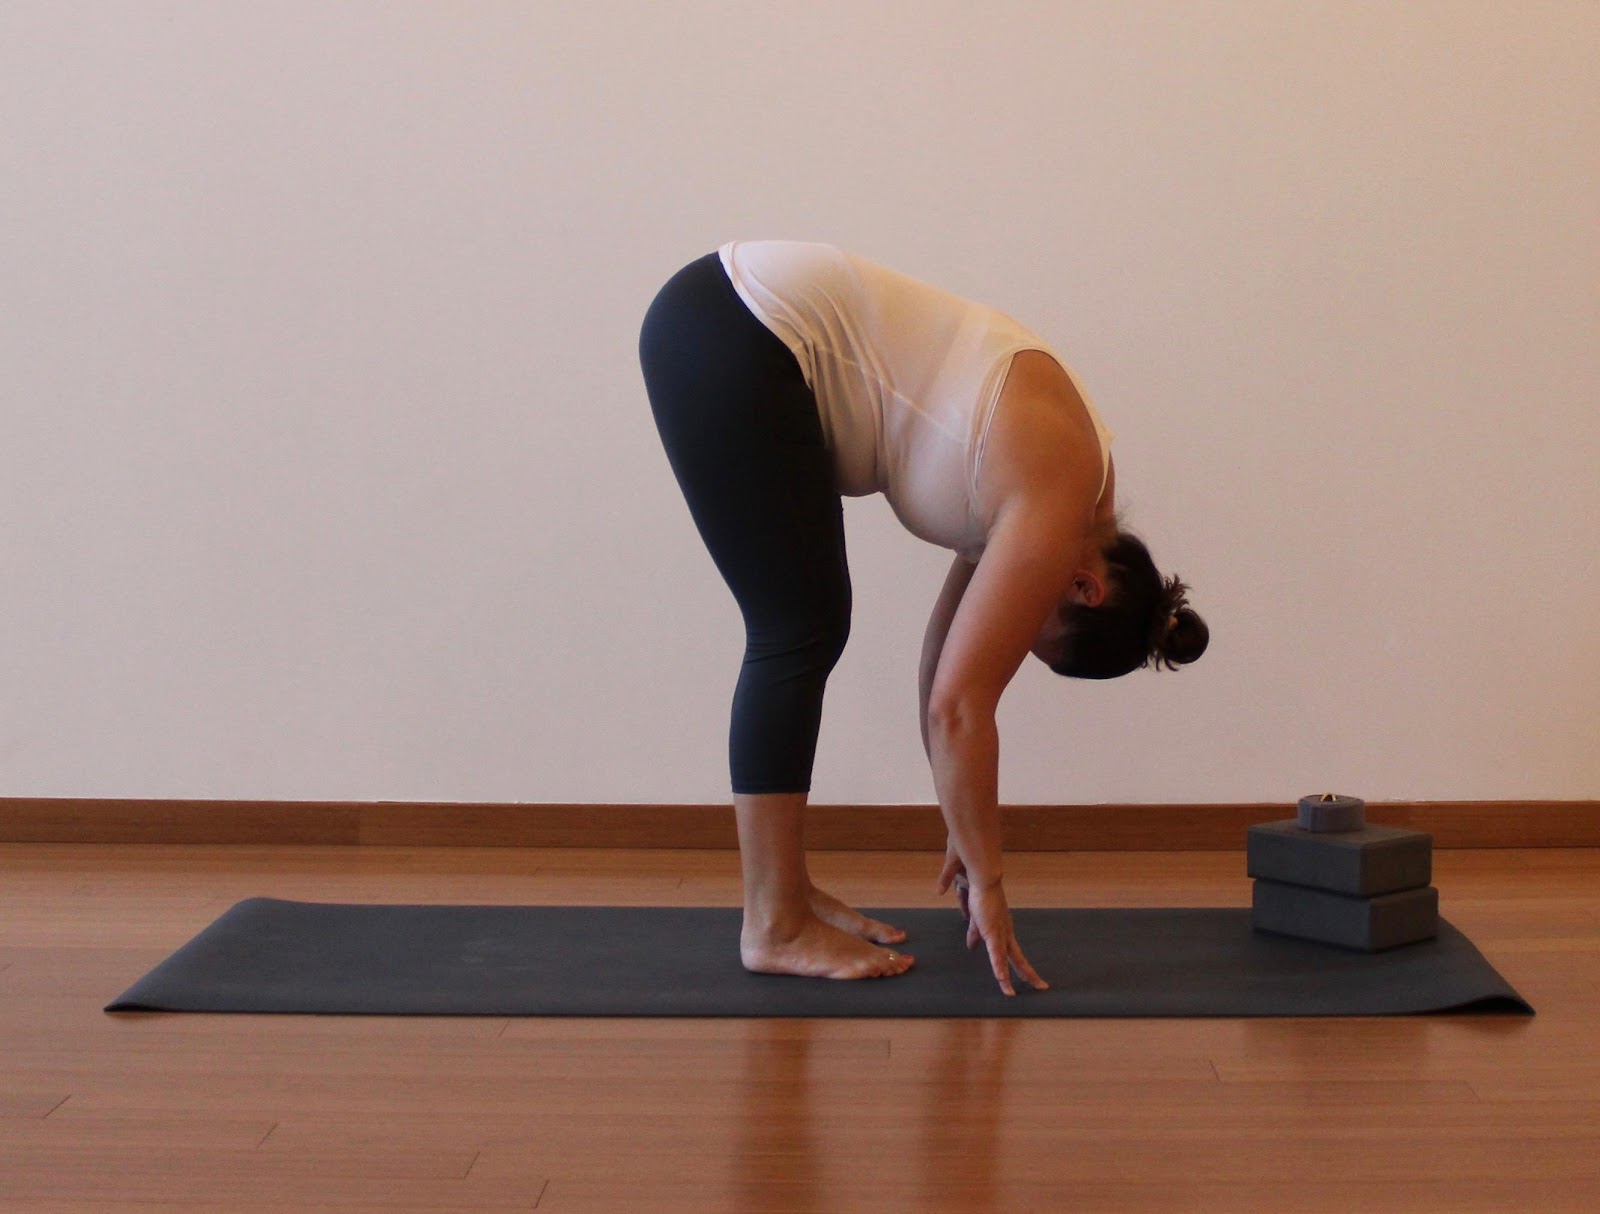
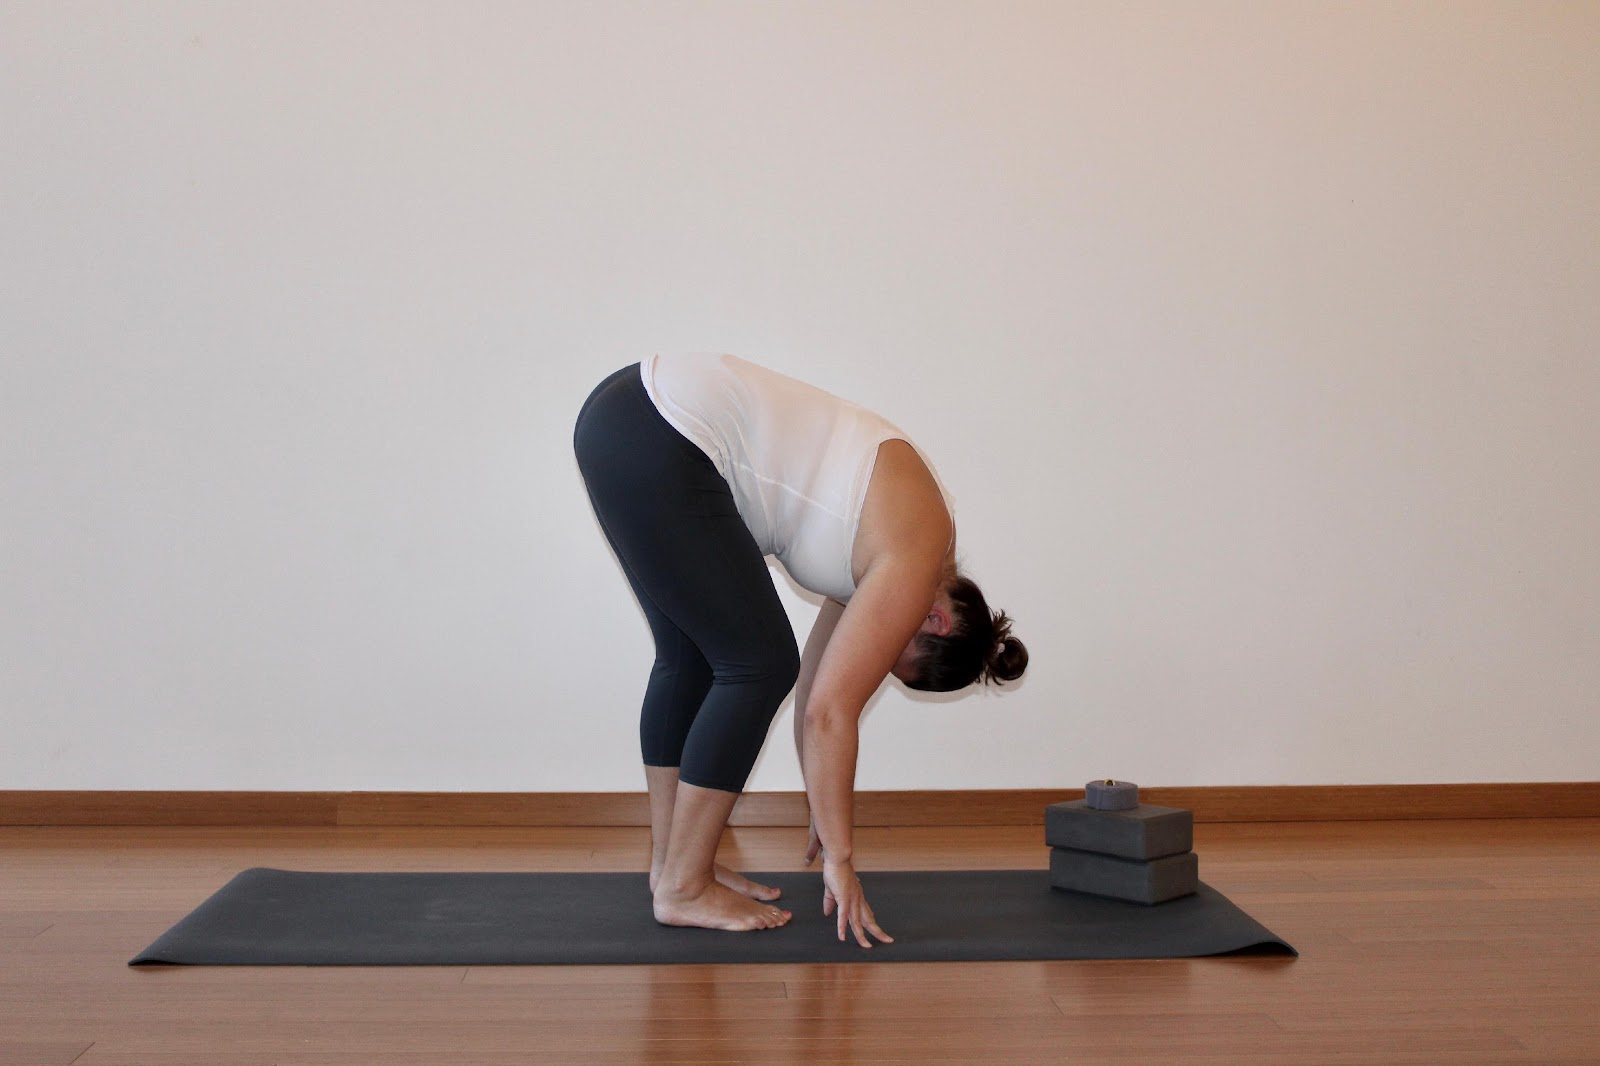
Forward Fold

  • Walk your feet to your hands and come into a forward fold. Take your feet slightly wider than hip distance as you take your hands to opposite elbows. You can stay still or give a gentle sway from side to side.
  • Bring your feet to inner hip-distance and release your hands towards the earth. With slightly bent knees, press through your feet, take your arms out wide, and rise to stand. Bring your hands together and through heart centre.

Tree Pose

Tree pose
  • With your hands on your hips, externally rotate your right thigh and place your right foot anywhere on your inner left leg. Press your right foot against your left leg (as long as it is above or below your knee), and lengthen your tailbone towards the ground. Keep your hips level, and you can use your hands to help you balance or challenge your balance and bring your hands to heart centre or reach your arms towards the sky.
  • Hold here for 5 breaths.
  • Move your right knee to centre, bend your left knee, and lower your hands to the earth as you step your right foot back.

Low Lunge With Your Hands Clasped

Low lunge
  • Lower your right knee to the ground, and place your hands on your hips. Level out through your pelvis again, from left to right, as well as front to back. Find a stretch through the front of your right hip and / or thigh.
  • Root your tailbone towards the floor and then reach your arms behind you and interlace your fingers. This will help open up through your chest.
  • Hold here for 5 breaths.
  • Place your hands on either side of your left foot and step your right foot forward. Slide your hands up your shins to lift half-way, and then forward fold.
  • With slightly bent knees, press through your feet, take your arms out wide, and rise to stand. Bring your hands together and through heart centre.

Repeat tree and low lunge on the other side.

Plank

  • From Mountain Pose (Tadasana), reach your arms up, and fold over your legs. Lift half-way, and as your hands plant on the ground, step each leg back until you are in plank pose.
  • Hold for 5 breaths.

Lower onto your belly.

Locust (Salabasana)

Locust pose
  • Interlace your hands behind your back and press the tops of your feet into the earth. With your leg muscles engaged (you’ll know as your knee caps will lift slightly), lengthen your spine and reach your heart forward.
  • Lift your chest and forehead away from the ground as you squeeze your shoulder blades together.
  • You can stay here and breathe or lift your legs away from the ground.
  • Your arms can stay where they are or you can lift them away from your back body (be sure to pay attention to how this feels in your shoulders).
  • Hold for 5 breaths, and then lower onto your belly.

Make your way onto your back with your feet on the floor, and underneath your knees.

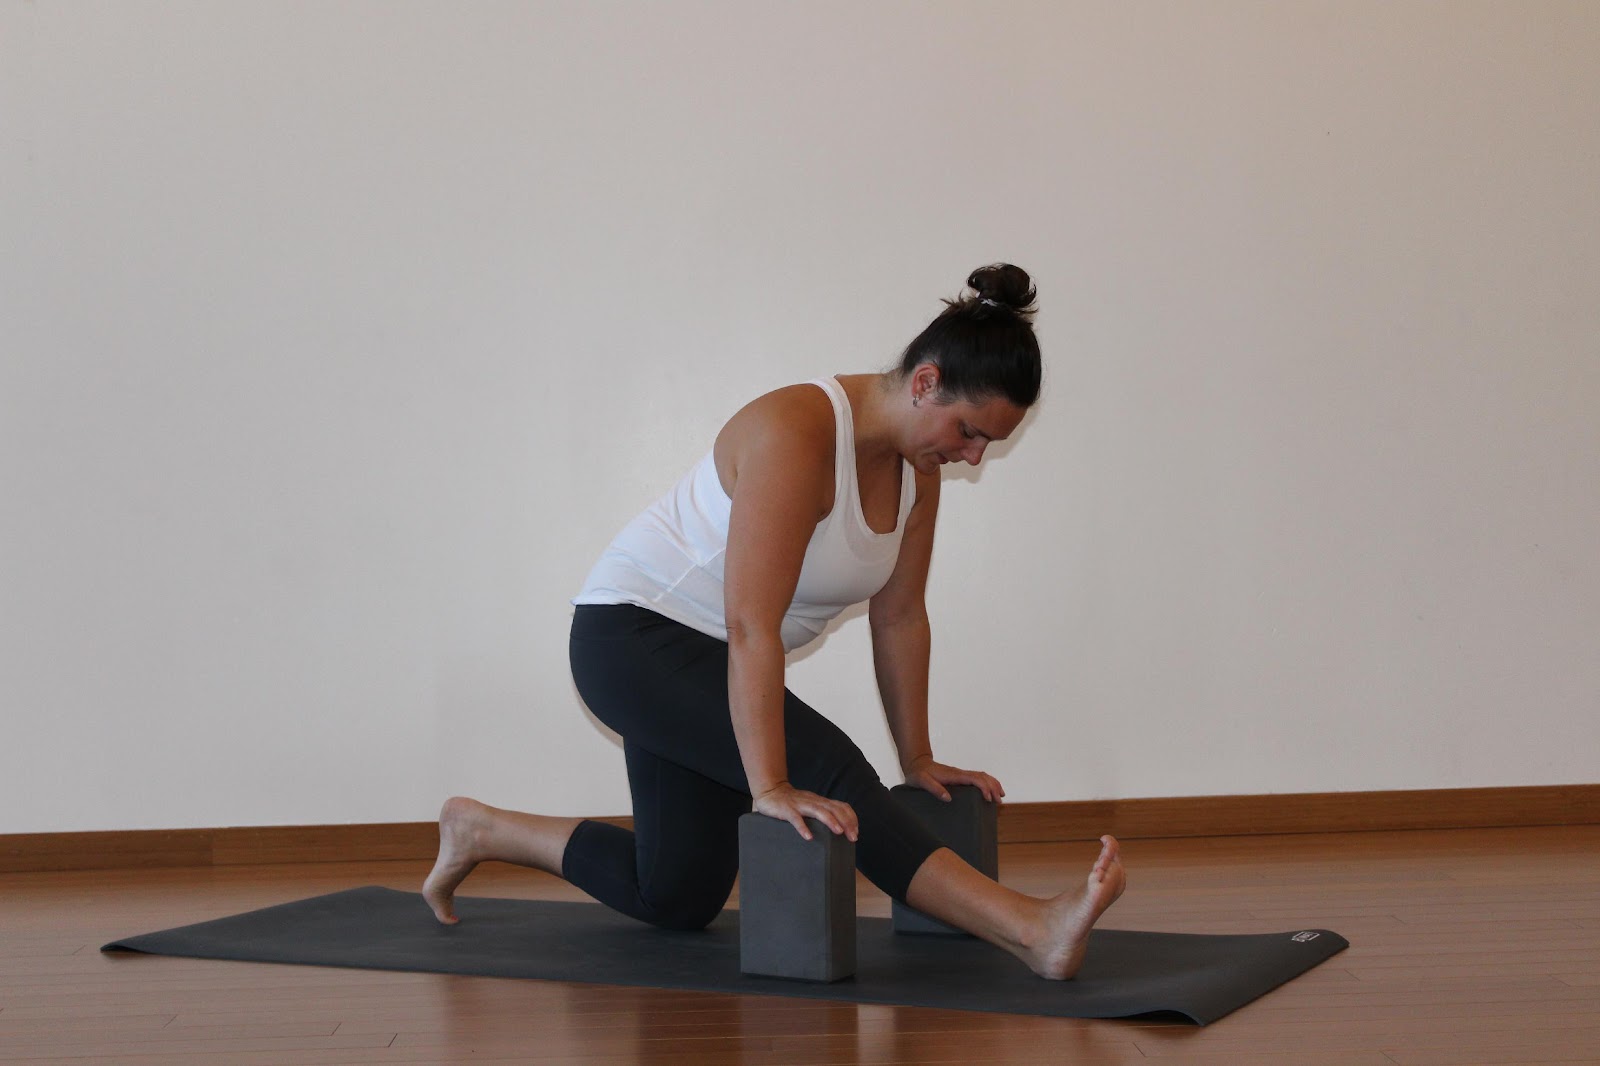
Figure 4 / Eye of the Needle

  • Lift your right leg and take your right ankle to your left thigh (closer to your knee than your hip).
  • Flex your right ankle.
  • If you need more of a stretch for your right hip / glutes, lift your left foot so your left shin is parallel to the ground.
  • Flex your left ankle.
  • Be sure your chest is open and your shoulder blades are on the ground. Your workday has brought enough rounding through your front body, so keep space across your chest.
  • Hold for 5 breaths and lower both feet to the ground.

Repeat on the left side.

Bridge

Bridge pose
  • With your feet inner hip-distance apart and your feet under your knees, inhale to lift your hips away from the ground.
  • Draw your shoulders away from your ears, interlace your fingers underneath your body, and draw your shoulder blades closer together.
  • Press down through your feet and see if you can lift your hips higher.
  • Feel the back of your head gently press into the floor so that your chest lifts up towards the sky.
  • Hold here for 5 breaths.
  • Release your hands, move your arms out from under you, and slowly lower your hips onto the earth.

Savasana

  • Let your entire body rest on the ground. Take your legs out wide, let your palms turn up to the sky. Let your eyes soften or completely close.
  • Stay here for at least 3 minutes (if you are on a schedule, set an alarm to be sure you don’t stay here longer than you can).

Slowly bring movement into your body, stretch long through your body, roll to one side. Sit up tall, bring your hands to heart centre, and notice how your body feels.


Photo credit: @violetanneyoga

15 minutes to stretch your hamstrings

Got tight hamstrings and 15 minutes?

Your hamstrings are a group of muscles that run along the back of your upper leg. They’re used for walking, running, flexing the knee, and adduction (bringing the leg towards the midline of the body) of the leg. If you are doing activities that are taxing your quads, you’ll want to be sure to pay some attention to your hamstrings and give them a stretch, as they are the antagonist muscles to your quadriceps. (Stretching them can also be good for your back!) If you’re curious to know more details on each muscle of the group, check out this post from Very Well Fit. If you’re ready to stretch this group of muscles, grab a mat, yoga strap, and two yoga blocks, and we’ll get started!

Start by laying down on your mat. Stretch your legs long in front of you and let you body relax. Close your eyes and take a few deep breaths. Start to notice how your body feels. Do you feel a difference from the back of one leg to the other? Just take notice on what you find. You’ll come back to this later.

  • Start to wiggle through your fingers and toes.
  • Blink your eyes open and bend your knees.

Supta Padangustasana A (Modified Reclined Hand-to-Big-Toe Pose)

  • Take your yoga strap, and place it around the ball of your right foot.
  • Press your heel towards the sky and walk your hands towards the ends of the strap. Gently pull the strap towards you, bringing your thigh closer to your chest, until you feel a stretch through your hamstrings.
  • Keep your left foot on the floor or extend your left leg long on the mat.
  • Hold for 5-8 breaths.
  • Bend your right knee, remove the strap, and stretch both legs out in front of you. Notice if you feel a difference from one to the other.
    Bend your knees, and repeat this on the left leg.

Roll to one side for a few breaths and then press up to a seat.

Virasana (Hero Pose)

  • Sit on your heels. Let your palms rest face-up on your thighs.
  • Breathe here for 5-8 breaths.

Place your hands by your knees, tuck your toes underneath, and lift your hips as you straighten your legs. You’ll be in a forward fold, Uttanasana.

Hold here – noting how things feel through the backs of your legs – for 5-8 breaths.

  • Bend your right knee, as your left leg straightens. You can hold here for as long as it feels like a good stretch.
  • Bend your left knee, as your right leg straightens. Hold this for as long as it feels like a good stretch.
  • Bend one knee at a time as you move with your breath, and do this for 3-4 times on each side.

Parsvottanasana with Blocks (Pyramid with Blocks)

*Bring your blocks to the top corners of your mat.

  • From Uttanasana, step your right foot back, and bring your right heel to the floor at a slight angle.
  • Step your right foot slightly wider.
  • Bend your left knee, so that it is stacked over your left ankle.
  • Take your hands to the blocks.
  • Lift your hips up, and send them back while you straighten your left leg.
  • Move your blocks and /or hands back so that your wrists are under your shoulders.
  • Keep your hips square, and be sure to draw your left hip back as your right hip wraps forward.
  • Lengthen your spine as your heart reaches forward, and then fold over your left leg. Adjust your hand placement if needed, and /or change the height of your blocks.
  • Press firmly into your back (right) foot.
  • Hold for 5-8 breaths.
  • Bend your left knee as you walk your hands forward.
  • Lift your right heel, turn your toes to face the front of your mat, and step your right foot to meet your left.
  • Stay in Uttanasana (forward fold) for a few breaths, being aware of how your left hamstrings feel in relationship to your right.

Repeat on the other side.

  • From Uttanasana, bend your right knee and walk your hands around your right foot.
  • As you do this, straighten through your left leg.
  • Continue to walk your hands to the right until you feel the desired stretch through the left hamstrings.
  • Hold for 5-8 breaths.

Bring your hands back to centre, and repeat on the other side, bending your right knee, and then walking your hands around your right foot.

Ardha Hanumanasana (Half Splits)

  • From Uttanasana, step your left foot back and lower your left knee.
  • Straighten your right leg by walking your foot forward, 6-8 inches.
  • Take your hands to your blocks and then draw your hands towards you until your wrists are underneath your shoulders.
  • Lift up through your chest and stay light on your fingertips.
  • Flex your right ankle as you draw your toes away from the floor.
  • Draw your right hip back as your left hip wraps forward.
  • You can stay upright through your torso, or hinge from your hips to fold over your right leg. Feel free to change the height of the blocks as you fold, depending on your depth.
  • Hold for 5-8 breaths.

Slowly lift your chest, move your hands and / or blocks forward, bend into your right knee, lift your back knee, and step your left foot forward.

From Uttanasana, repeat on the other side.

Savasana (Corpse Pose)

  • Lay down on the mat.
  • Reach your legs long in front of you as you draw your shoulders away from your ears.
  • Let your body relax into the mat.
  • Stay here for 2-5 minutes.
  • Slowly move your body, roll to one side, and press to a seat.

When you stand up, take note on how your hamstrings feel. You might even notice that as you bend over to roll your mat or pick up your props, your legs feel more spacious. Enjoy this flexibility and come back to this routine any time your hamstrings need some love!

5 Things to Consider When Choosing a Yoga Retreat

Have you ever considered going on a yoga retreat? A retreat offers an opportunity to dive a bit deeper into your yoga practice, no matter what level you are at. With the common everyday distractions – work, commuting, family obligations, household chores – removed, there is no excuse for not making it to your mat. While you are on a retreat, everything is (or should aim to be) curated to allow you to take time for yourself and for your practice. On some retreats, all meals are provided for you. This means that you don’t even have to think about what to make for lunch or dinner, let alone, shop for the ingredients, prep, or clean up. Retreats can create space for you to self-reflect, explore more about your yoga practice, pamper yourself, meet new friends, discover a new city or country, and much more.

A quick Google search will confirm that there are no shortage of yoga retreats out there. If you’re looking to narrow down the choices and find some that could be a great fit for you, here are a few things to take into account.

1.Location

Where is your retreat happening?

Is it nearby, which requires you to take a car, train, or short flight to get to? While some of these retreats can appear to be a bit more expensive, they are often more affordable to travel to and require less time away from work and family to get to. If your retreat is offered in a place that requires extensive travel, you’ll want to take a look at flight prices for the time of year you will be going and what the flights look like. Your destination might be close to the airport, or you might need another flight or some other mode of transportation to get you there. Read what is included for each retreat, as some offer one-way or roundtrip transfers from local airports, which can help alleviate stress and save on added costs.

Think about where you want to go and why you want to go there. If you’ve always dreamed of exploring the serene hills of Tuscany with a lover, a solo retreat there might not make the most sense. Think that a jungle retreat to escape the hustle and bustle of city living or your family demands will do you good? It might, but make sure you find out the details on if you will be forced to completely disconnect or if there is an option to check your email or make calls to home every few days. It’s good to think about the purpose of your retreat which can help narrow down some viable location options. Once you have your intentions clear, it will help you decide if you’re taking this trip on your own, or if you want to explore the retreat with your partner/family/friends.

2. Instructor

Who is going to be leading your yoga and meditation classes?

If it’s a teacher who you have practiced with before, you probably have a good idea of the types of classes they teach, their style, and personality. If your teacher is local, go take a few classes with them. If your retreat is with a teacher you don’t know, or they are not nearby, there are a few things to consider. You might see if they have any online videos so you can get a sense of their teaching style. You can take a look at their website or social pages as this will let you know what kinds of classes they regularly teach, and give you some insights to what they value and want to express in their teachings. If you’re looking for Vinyasa classes and want to work on your sun salutations on your retreat, check and see if your teacher has experience with and a passion for this too. If that is what you’re looking for and you sign up for a retreat with an instructor who specializes in gentle hatha and restorative practices, you may be disappointed. Don’t be afraid to reach out and ask questions! Most teachers want you to get the most out of your retreat experience and will be happy to email, chat, and answer any questions you may have.

3. Yoga Classes/Styles

Most retreats offer one to three classes a day.

  • How many classes are offered each day (this might also vary each day depending on the overall schedule) and what types of classes are they?
  • If the retreat you are looking at only offers an early morning class and you choose to sleep in, are you okay with missing the only class of the day?

If a retreat has several options, you might indulge in taking an afternoon siesta, or strolling through a nearby town/village to take in the sights knowing that you can get your yoga in at another time of the day. There might be some different options than you are used to seeing at your local studio. This article from HealthyWay explains the different types of yoga that are generally offered. You might go on a walking mediation to experience the sights, sounds, and feels of nature. If you’ve never tried restorative yoga before and it is on the schedule, this might be your chance to try it out and see what you think. Come back to your intention for taking the retreat and see how this matches up.

You will also want to note what kind of yoga experience is helpful to have for your specific retreat. While many offer classes suitable for all levels of practice, look at the types of practices offered and the length of time they are. If you are newer to yoga and your desired retreat is only offering 90-minute classes, it might be a bit intense. It is a good idea to have a least a few months of yoga under your belt before signing up for a week long retreat. This way you’ll know the poses and the names of them, how they feel in your body, and have the stamina for consecutive days of practice. Again, reach out to the instructor and be honest about where your practice is at and how this will fit into what is being offered.

4. What’s Included

It is important to know what the cost of your retreat includes.

Most retreats do not include flights, so do some research and find out what the costs are to get there. If you’re staying local, ask your organizer if there is an option to catch a ride with someone nearby. Some retreats include all meals, while others include only certain meals. If you’re flying to your destination, check to see if transportation from the airport to the retreat location is included. If you want to catch a volcano sunrise while you are in Hawaii, what will be the extra cost to get there and make this happen on your own? If you’re heading to Mexico and are excited to enjoy some margaritas, you’ll want to know if any alcoholic beverages are included with your retreat package. Read the fine print, and if you’re still not sure, reach out to the organizer/instructor or retreat centre itself.

5. Cuisine

As a foodie, this one is important to me! Many yoga retreats default to vegetarian menus. There are some that are more specific and offer vegan cuisine. If you’re on a retreat that is focused on cleansing, you might see more juices or plant-based foods. I have been on retreats that serve fish and/or meat as they are local and considered an important part of the culture. An Italy retreat might offer up some local wine, while a beach retreat might have an abundance of coconut water. If you are responsible for some meals on your own, you might want to do a little research on what the local cuisine consists of. Put this into your budget too, as it will add to the overall cost of your getaway. Most places are very accommodating when it comes to dietary restrictions, but be sure to double check that they can take care of what you need them too. 

While there are some things to consider, choosing a retreat is also a very exciting time to ask yourself some questions and get clear on what you want to get out of this amazing experience. With so many great options out there, your perfect retreat is just waiting for you to say “yes”!

If you’re looking to book soon, check out the following options!

Happy travels!

How to Stretch at Your Desk: Yoga while you work

Last month we took a look at the effects that sitting for long periods of time can have on the body. I shared a simple yoga sequence to help alleviate some of the pain points many people experience from repeatedly sitting at a desk all day. I’ve taken this a step further and have put together some yoga stretches for you to do at your desk!

Most of us already know that movement is essential to our health. And we’re painfully aware that the majority of us are not currently getting enough movement in any given day. But why does the body need to move?

First, moving the body is essential to keeping it limber. What does your body feel like after you’ve been sitting for too long? Do certain areas start to feel numb? Does your body feel stiff as you stand up and start to move? Professor, James Levine reminds us that “humans were designed to walk.” In fact, we’ve been walking for over 7 million years. Which means that we’re just scratching the surface when it comes to understanding how sitting is detrimental to our health. When we sit for a long period of time, we start to cut off blood flow to certain areas of the body and frequent movement helps get the blood flowing properly and efficiently.

Think about what happens to your spine as you sit at your desk; the rounding, hunching, and compression of the spine. Our spine is designed to move in a variety of ways, and sitting at a desk all day doesn’t allow for this movement to happen. According to this article in the Huffington Post, “the average healthy person’s back will take a beating from this low-energy lifestyle, leading to increased pain, stiffness and long-term problems.” If you were to pause right now and take a snapshot of your posture, what does it look like? Are there any adjustments you can make, right now?

We’ve all experienced the “brain fog” that sets in when we’ve been sitting and pouring over a spreadsheet, contract, or other data. Getting up and moving is also good for the brain. Choosing to get up and move will allow your eyes to take a rest, your laser-like attention to shift to something else for a few moments, and will get your blood flowing. When more blood flows to the brain, we increase the amount of oxygen, which helps us think in a more focused way. Livestrong shares that the fastest way to get a dose of oxygen for your brain is to take a walk.

Here are some stretches that you can do at your desk. Be creative and use what you’ve got! Chairs, desks, and even walls can all be great props and help support your office stretch session.

Side Bend

This is a great way to move the spine in a lateral direction.

  • Stand with your feet inner hip-distance apart; stack your hips over your knees and ankles. Be sure that your hips are square (level, left to right).
  • Reach your right arm up overhead and then reach your arm towards the left.
  • You might find that after a few breaths, you are able to go deeper in the stretch.
  • Hold for 5 cycles of breath.
  • Repeat on the other side.

Backbend

This stretch will help to open the chest and front body; it is also a great pose to help counter balance the effects of computer work.

  • Stand with your feet inner hip-distance apart; stack your hips over your ankles and knees.
  • Place your hands on the backs of your hips, like you were placing your hands into pant pockets.
  • Draw your inner elbows and shoulder blades together.
  • Tuck your chin towards your throat.
  • Keep your low back long (there is a tendency to compress the low back and we want to avoid this) and start to lift your chest towards the sky.
  • As your chest lifts, start to move it towards the space behind you (I like to think of an imaginary string lifting the centre of my chest up towards the sky.).
  • Let your gaze travel towards the space behind you as you draw the sides of your throat back to keep the back of your neck long.
  • Hold for 5 cycles of breath.
  • Slowly lift up out of the pose.

Forward Fold

This stretch will help the spine to decompress; great to do after sitting.

  • Be careful with this pose if you have high blood pressure. You will want to rise up slowly so that you don’t get light-headed.
  • Stand with your feet inner hip-distance apart; stack your hips over your ankles and knees.
  • Bend your knees and fold over your legs.
  • Your fingers can come to the floor or you can bend your elbows and bring opposite hands to them.
  • You can stay still or it might feel good to gently sway from side to side.
  • Hold for 5 cycles of breath.

Hip Stretch

This pose is a great way to stretch out the hips, which are often sore from sitting.

  • Come closer to the edge of your set. Sit up tall, with your back away from the seat, and with your feet on the floor. 
  • Lift your left leg up away from the floor.
  • Externally rotate your left thigh bone at the hip (think of playing hackeysack and as your knee moves away from your midline, the inner part of your foot turns up towards the sky).
  • Place your left foot onto your right thigh. You can take a hold of your ankle and help get it to your thigh (no worries!).
  • This could be all the stretch you need. If so, hold here and breathe.
  • If you need more, take your left hand to your left thigh or shin and gently press down, or start to bring your chest towards your thighs, which will deepen the stretch.
  • Hold for 5 cycles of breath.
  • Switch to the other side with your right ankle on your left thigh.
  • Hold for an equal amount of time on this side.

Seated Twist

Twists are naturally detoxifying and feel good to do after sitting for awhile.

  • Sit up tall, closer to the edge of your seat (away from the back of the chair), with your feet on the floor.
  • Take your right hand to your left thigh.
  • Place your left hand on the seat of the chair and close to your left hip.
  • Inhale and grow taller through your spine (think of your head reaching up closer towards the sky) and exhale to take a twist to the left. 
  • Be sure to keep your sitting bones evenly rooted into your seat; your hips should remain level, with your body moving/twisting around your spine.
  • You can take your gaze over your left shoulder.
  • Hold for 5 cycles of breath.
  • Return to centre and repeat on the other side.

Neck Stretch

This stretch will help alleviate tension in the neck as well as soothe neck strain.

  • Sit up tall, closer to the edge of your seat (away from the back of the chair), with your feet on the floor.
  • Take your right hand to the left side of your head.
  • Draw your right ear to your right shoulder, until you feel a stretch through the left side of your neck.
  • You can stay here or if you need more of a stretch, place your left hand by your side and flex your wrist.
  • Hold for 5 cycles of breath.
  • Use your right hand to gently return your head to centre and repeat on the other side.

Finger Stretch

A simple and effective way to move and stretch the fingers.

  • Sit up tall, closer to the edge of your seat (away from the back of the chair), with your feet on the floor.
  • Reach your left arm out in front of you.
  • With your right fingers, draw each one of your left fingers towards you. Hold for a few seconds, and then move on to the next, until each finger has had a good stretch.
  • Repeat on the other side.

Don’t be afraid to get creative! Have a favourite exercise that you normally do at the gym or in your weekly fitness class? Can you find a way to modify it and bring it in to your daily stretch routine? Remember to get up and move and stretch throughout the day; your body will thank you for it!

Five Poses For Desk Jockies

This is for all the desk jockeys out there. You know who you are. Your days are spent in front of a computer – you’ve likely got tight hips, a sore low back, rounded shoulders, neck pain, wrist pain, overall poor posture, and soreness – and you know that your posture is taking a hit. You can feel the effects that your non-physical job is having on your physical body, and you know that you need to take action in order to feel better.

You have likely heard the saying that sitting is the new smoking. When those words first rang through my ears, I had to pause and really thing about them. Could it be true? No. I mean, maybe? Hmm. While being sedentary isn’t quite as harmful as inhaling carcinogenic chemicals, sitting can wreak havoc on your body.

According to Dr. Alice Chen in this Huffington Post video, the average American is sitting for 7.7 hours per day! As we sit there are many physical and physiological effects on the body.

Side effects of sitting include:

  • Sore and tight muscles due to reduced circulation;
  • Low back pain due to compression of the spine;
  • Compression of your ribs, lungs, and digestive organs;
  • Over-stretching of the rhomboids and upper back muscles;
  • Neck strain;
  • Brain fog, also due to lack of circulation and getting oxygen to the brain.

Now that we know some of the nasty side effects that can happen from too much sitting, let’s talk about some yoga poses that you can do to help lessen the side effects.

Hold on a second, my timer just went off, which is my reminder to get up and move. So, how about if you close your eyes and take 5 deep breaths? This will give you a moment to connect to your breath, and will also give me time to stand and stretch.

Thanks! Ok, I’m back. Experts recommend that we take a break from sitting and get up and move. In this TODAY article, Keith Diaz – a lead author at Columbia University Medical Center – suggests movement every 30 minutes, even if it is just for 60 seconds. You can set a timer or your phone to remind you to get up and move. You might take a lap around your office, fill up your water glass, or just stand and fold over your legs, which will also help your spine to decompress.

Here are 5 yoga poses that will help counter the effects of sitting. It won’t take you long to get through all of these, so no more excuses, get moving. NOW!

  1. Cow/Cat

These two poses help to bring movement into the spine, open up the chest, and unite movement and breath.

  • Come to a tabletop position, with your wrists under your shoulders and your knees under your hips. Your toes can be tucked (as shown) or untucked.
  • As you inhale, soften your belly towards the earth. Widen your collar bones as you pull your heart through your shoulders and look up. Let your sitting bones widen apart and point up towards the space behind you.
  • As you exhale, push the earth away from you. With the movement initiating from your tailbone, round through your spine as you look towards your thighs. Squeeze your belly button towards your spine as you empty the air from your lungs. Spread your shoulder blades apart. Keep your neck muscles relaxed. Create a lot of space between your chest and the earth.
  • Continue for 5 cycles of breath.

*For an added stretch through the forearms, turn your hands so your fingers are pointing towards your knees, with the heels of your hands flat on the earth. You might need to bring your hands closer to your knees. If you don’t feel a stretch, start to slowly move your hips towards your heels until you find the desired stretch.

  1. Downward Facing Dog

This pose helps to lengthen the spine, strengthen the wrists and arms, decompress
the low back, and stretch the legs.

  • Start in a tabletop position with your hands placed outer shoulder-width apart. Walk your hands one hand’s length forward. Align your middle fingers to point straight ahead while spreading the fingers wide.
  • Connect the base of each finger to the ground and then press down through the fingertips and heel of the hand. Be sure to keep the outside edges of your index fingers pressing into the earth and not peeling away from it.
  • Tuck your toes, lift your knees and draw your sitting bones towards the space behind you. Bring length into your spine until you are in the shape of an upside-down letter “V”. Look at your feet to be sure they are placed hip-width apart (about two fists-width between the inner edges of your feet).
  • Spin your inner elbows slightly up towards the sky until you feel your upper arm bones externally rotate and your collar bones widen. Feel the arm bones plug into your body as the shoulders draw away from your ears.
  • Keep length in the spine and feel the torso lengthen as the hips pull back. Soften the space behind the knees and reach the heels towards the ground.
  • Look forward and check to see that your hands are still connected to the earth. Keep your ears in line with your biceps and the muscles of your neck relaxed. Feel your side body muscles of your upper and mid back engage, which will help stabilize you and bring length to the spine. Strengthening these muscles helps alleviate strain on the wrists and you’ll create a sustainable Downward Dog.
  • Hold for 5 breaths.
  1. Standing Backbend

This pose helps to open the chest and strengthen the upper back body.

  • With your feet hip-distance apart, take the heels of your hands onto the backs of the hips (like you were placing your hands into pant pockets) with your fingertips pointing towards the ground.
  • Lengthen your tailbone towards the earth as your belly draws up and in.
  • Draw your inner elbows together and bring your shoulder blades closer together. This will help lift the back of the heart towards the front of the chest.
  • Draw your chin towards your throat and then lift your heart up towards the sky. Let your eyes look towards the space behind you.
  • Root through your heels and keep your hips stacked on top of your knees (so they don’t press too far forward).
  • Use your inhale breath to find expansion through your collar bones and exhale as you draw your shoulder blades closer together and open through your chest.
  • Hold for 5 breaths.
  • Use your inhale breath to slowly rise back up.
  1. Supported Bridge

This pose helps relax the hip flexors (which are often tight from sitting) as well as open
up the chest.

  • Lie down on your back with your knees bent, your feet hip-width apart, and your arms by your sides.
  • Press your heels into the ground and lift your hips up towards the sky.
  • Keep the space that you have created underneath your hips, place a block (or two) underneath your sacrum (base of your spine), and then lower your hips down to the block.
  • Hold for 5 breaths.
  • Press down through your heels, lift your hips, remove the blocks, and gently lower your hips to the ground.
  1. Twist

Twists are great for overall spine health and also act as a way to naturally detoxify the
body.

  • Lie down on your back with your knees bent and your feet hip-width apart. Reach your arms out wide.
  • Press down through your heels to lift your hips and slide them a few inches to your left, then set your hips down.
  • Let your knees gently fall to the right, bringing them towards the ground.
  • If there is space between your knees, you can place a block in between the knees or underneath the right knee.
  • Turn your head to the left as long as there is no discomfort in your neck.
  • If the twist feels too intense, press your feet away from you, which will take the knees away from the chest.
  • If you want to make the twist more intense, draw your knees closer towards your chest.
  • Hold for 5-8 breaths, longer if you like.
  • Bring your gaze back to centre, and then bring your knees and hips back to centre.
  • Repeat on the left side.

Sometimes, it is the smallest changes that can lead us to different, healthier habits. Begin to notice how your body feels when you return back to the office. As your brain and body start to communicate more effectively, you might find that your posture at work starts to improve. You might notice that your body is a bit less stiff than it used to be. Help reduce office fatigue by choosing to get up and move throughout the day, and add these simple stretches into your daily routine. Desk jockey, you’ve got this!