|
Can’t meet face to face?
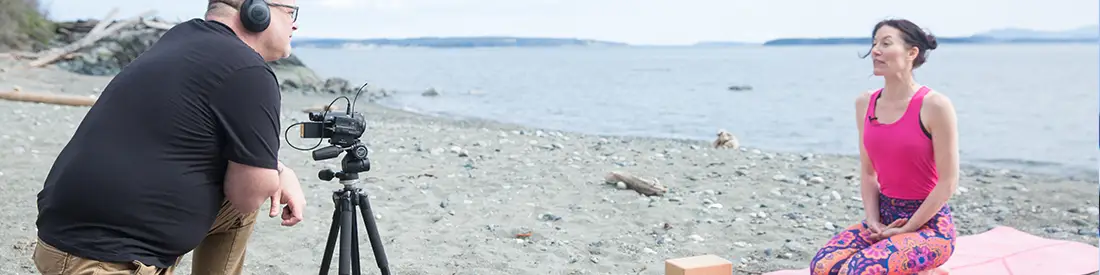
If you’ve never used tech to go online before, it can seem intimidating. Here are some tips and my favorite tools to get you started easily. In this post, we’re looking at “live” aka “streaming” options, which put you online in the moment. Also, for more info on how to shoot well, check out my tools and tips for “How To Teach Online Yoga Classes.”
Facebook live is great for a quick check in, or live streaming a class or conversation in real time. Because the time limit is so generous (8 hours), FB is a great option for longer streams.
You can save the video to your profile to people can see asynchronously, and you can also save it to your camera roll to preserve for posterity. One note: Facebook is not an archive; people see your posts basically the day you post it and that’s it. So if it’s a good video, you will want to save it and post it elsewhere for posterity (I tell you how, below).
Now, you can post publicly, or you can post privately to a group. So if you want to use FB to livestream, but manages who sees it (for example, you’re streaming to a group of students who have paid to have access to your online classes), you can easily manage those permissions.
The Summary
How To:
Ta da!
Easy. It will take while to process. Facebook will let you know when it’s done. You can click the three little buttons in the upper right hand corner of the post to edit.
With Instagram, you can post live via your Stories. However, because IG Stories shoot in 15 second chunks, this platform is better for shorter conversations (I like a minute or two). Theoretically, you could have a really long video in there, but I don’t think it’s the right platform for that kind of duration.
Like Facebook, Instagram story lives are not an archive; people see your posts basically the day you post it and that’s it unless they scroll. So if it’s a good video, you will want to save it and post it elsewhere for posterity (I tell you how, below).
The Summary:
How To:
A note on the recording time: Instagram Stories are broken into 15 second clips. When someone watches your story, they will run together sequentially as if there is no break. So you can talk for as long as you like, but if you want to do any editing of your clips (color correcting or adding hashtags), you will have to edit each segment separately. It’s easy to do, but may be tedious if you decided to chat for 3 minutes (you’d have 12 clips to edit).
My fave “third party” for streaming is Zoom. Tried and true, and used by organizations everywhere. Unlike Facebook or Instagram, you would use Zoom to stream to a specific group of invited individuals. However, you could still post the video later onto your social media streams if you wished.
With the free version of Zoom, you can 100 participants for up to 40 minutes. For longer (or more people), you’d have to pay if you want access for more than 40 continuous minutes. Prices are reasonable.
Some Zoom perks:
Another perk of Zoom: unlike Facebook, Instagram, or Skype, you don’t have join Zoom to attend a Zoom meeting.
The Summary:
Go to zoom, and download for your desktop. You can create and schedule meetings, invite others to your meeting, and record your live cast for posterity. A rough guide “how to” is below.
How To:
These apps are free, and relatively easy to use. I’m grouping Skype and Google Hangouts together as – at least to me – they seem similarly limited in scope. They’re free, and both of them are good for conference calling and screensharing. However, participants need to be a member of these respective host sites to join a meeting on them.
With Skype, you have up to 50 people on a call, you can record the call and you can mute participants. However, I did not find an intuitive way to edit how the video was recorded so that you capture only the host. While this is okay for an educational broadcast, it’s awkward if you want to record and replay a live class stream.
On Google Hangouts, you can have up to 25 people on a video call. However, you can only record your calls if you have the Enterprise edition of a Google Suite. Also, when you record, it will record visible active participants (“pinning” a participant won’t impact how it’s recorded).
While Skype and Google Hangouts are useful for small group or 1-1 meetings, they fall short if you want to record your meeting for posterity.
A caveat: while you can screen record anything that you play on your computer with a third party app, this isn’t a great idea for two reasons: 1. it’s illegal in many places to record people without their knowledge, and 2. screen capturing can deliver bad audio. If you want to record a session, I think it’s generally better to use a service like Zoom that is more geared to conferencing and recording.
Options out there for screencasting, livecasting, and recording are always developing. These are several common tools that are familiar to many people and your participants. If you have any faves that you want to share, please list them below.
Rachel supports yoga teachers and studios around the world to create transformational education experiences that help them thrive in their business, share their passion, and inspire more people to practice yoga. Her extensive knowledge and experience include: earning two masters degrees, authoring three books, leading 4,000+ hours of TT, building a teacher training college for a national yoga company, and working behind the scenes in yoga studio & teacher management for more than fifteen years. As a writer and speaker, she continually wrestles with the juicy bits of life: relationships, authenticity, and discovering meaning in this crazy, wildish world. E-RYT 500, YACEP, BA, MFA, MSci. Learn more about Rachel.


2 replies on “Five Ways To Livestream An Online Yoga Class”
Thank you so much for sharing this valuable resource. Since our studio is closed, so I have to face my fears & learn as much as possible so our students can have a good at home yoga experience!
Margaret, you are so very welcome! I’m glad it’s useful for your community! XO