So you’ve created a 200 hour and have been running it for a couple of years. Now your students are looking for more and are asking you to create a 300 hour advanced teacher training. Where do you start?
First of all, don’t panic.
Creating a 300 hour yoga teacher training may be easier than you think!
First: Why It’s Easier Than You Think
When students graduate from a 200 hour yoga teacher training, they often have a sense of how they should teach in theory, but precious little skill in practice. Part of the goal of a 300 hour is to help your students integrate, embody, and innovate upon these fundamental skills. This goal means that you will be spending a good chunk of time having your students working on the practical aspects of their craft, which will take a good chunk of time:
Practice teaching work with detailed, specific feedback from trainers ~ 50 hours
For example: 2.5 hours on Saturday and Sunday for 10 weekends, round robin of teaching or structured practice teaching
Assisting faculty in public classes ~ 30 hours
Students can observe classes or assist faculty in classes with select practice teaching moments when they’re ready; perhaps they teach a by donation class for the studio under supervision
Holy heck! You’ve just planned 80 hours of your 300 hour training!
Not too shabby.
Now, these hours can not be haphazard, abstract, muddy, inconsistent, or unplanned. You will need to create clear benchmarks for skill development as well as measurable and specific criteria for success. But reinforcing your cuing basics (direct language, cuing from the ground up, cuing misalignments, stabilizing transitions, etc.) will take time and practice. So ensure that you are creating time and space in your 300 Hour to yoga teacher training to work on these foundational skills until they are organic and second nature.
Content for Your 300 Hour
So now that you’ve planned 80 hours of your program, what else should you include?
Consider:
Class Styles. The class styles of your studio or community: which styles do students need to learn? How do you want your teachers to teach? What are current gaps in knowledge that you would address if you could?
Sequencing. Oh sequencing! There are so many possibilities here! Creating sequences, creating sequences in different styles, teaching these sequences, adapting sequences, evaluating each other’s sequences, working on pacing, creating well-rounded classes, creating a progressive series…the possibilities are endless.
Anatomy. Ahhh anatomy! You know how much I love yoga anatomy! If you’re looking for support here, I have a 50-hour online anatomy program for 300 hour programs led by Gil Hedley. Take a peek here and ask me for a backstage tour.
Specialty Yoga. Candidly, I’m not a fan of putting together a bunch of speciality styles and modularizing them into a 300 hour yoga training. Though it may sound tempting from a business perspective (hey, I’ll just have a bunch of a la carte offerings and turn them into a YTT!), it undermines your ability to create a powerful and compounding journey withe one group of students. That said, if you have a particularly strong specialty style at your studio, such as hot or Yin, then you may consider incorporating a style into your 300, such as a 50-hour Yin Training.
Pranayama and meditation techniques. What do you want them to know? Build first on the basics. Reinforce the techniques from your 200 hour yoga teacher training program (meditation and pranayama) and then add plenty of time to both practice and group teach more advanced techniques that you want your teachers to know.
Ethics and values. How does a professional yoga teacher comport themselves? How do they contextualize conflict or manage challenging situations? What thorny issues may emerge for a yoga professional and what tools do they need to navigate these challenges?
Other cool stuff. Hands on assists, theming, mudra, mantra, chanting, kirtan, the subtle body, adaptive yoga, teaching beginners, yoga outreach, trauma informed yoga, speciality populations.
Your task: consider your ideal graduate. What skills, attitudes, and knowledge must they have to be a representative of your business? Brainstorm! Create a wild and crazy list!
Sample Hourly Breakdown
Okay folks, so let’s say that I’m helping you out with come of your content. Let’s break that 300 hours down into manageable chunks. Here’s how you might start to plan:
50 hours of practice teaching and feedback by trainees
30 hours of actual practice (guided practice by faculty)
10 hours of practicum (formal assessment)
30 hours of assisting and observing classes
50 hour: Yin teaching specialty
50 hours: Gil Hedley’s Integral Anatomy for Yogis course
10 hours of pranayama and meditation practices
10 hours of mantra, chanting
30 hours of philosophical study and ethics
10 hours of hands on assisting
10 hours of business
Uh…wait, we’re already at 290 hours, which is 20 past what we need for contact hours (Yoga Alliance only requires 270).
Feel more manageable?
Yoga Alliance
Yoga Alliance is currently (as of Feb 2024) more easeful and flexible with their 300 hour standards than they are with their 200 hour standards. There is a lot of latitude for studios to create trainings that are reflective of their mission and vision and as a result, they don’t dictate the “categories” of content as strictly.
Faculty needs to be registered as E-RYT 500 hour teachers
50 hours (at least) must be allocated to Techniques, Training and Practice
5 hours (at least) must be allocated to Teaching Methodology
30 hours (at least) must be allocated to Yoga Philosophy, Lifestyle and Ethics for Yoga Teachers
30 hours (at least) must be allocated to practicum (practice teaching, observation, assisting)
And YES you can teach online.
Final Thoughts
Hopefully this has helped de-mystify the 300 hour YTT and put it a little closer into reach!
The 300 hour yoga teacher training is a powerful and exciting offering for your community that can support your teachers to gain confidence in their skills and authenticity in their teaching voice. Launching your 300 hour YTT may be closer than you think!
I’m here to help! Reach out anytime for an informational chat or brainstorm and let’s make it a reality.
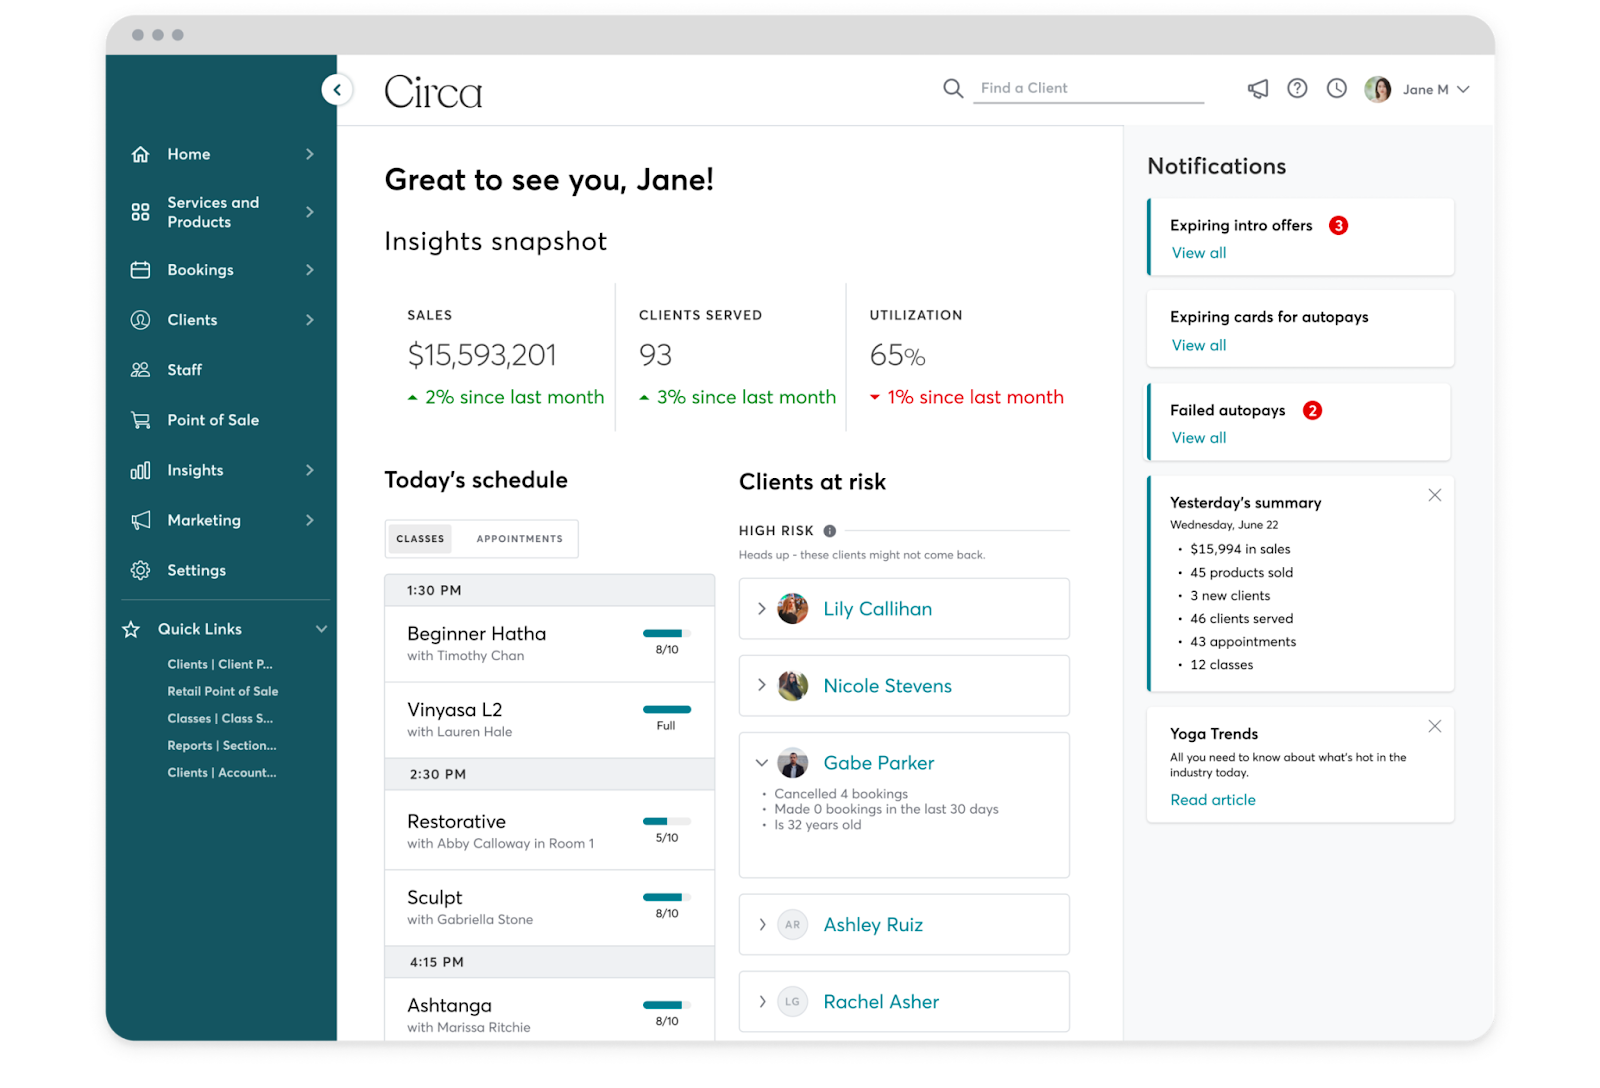
If you’re running a yoga business without yoga studio software, you don’t know what you are missing! The best yoga studio software will save time, money, and stress. See for yourself how a yoga studio software can transform your business for the better.
As a yoga studio instructor and owner, you are likely juggling many plates just to keep the doors open. There are some powerful tools out there to grow your business and keep your clients happy and coming back, so why not take advantage? We’ll help you understand and break down the plethora of options so you can make the best decision for your business.
Whether you are just starting out your yoga studio or have been in business for years, a yoga studio software takes a lot of the guesswork and administrative tasks off your plate. Yoga studio softwares generally include a package of tools and features to help your business run smoothly. The right yoga software for teachers, business owners, and clients alike will include the most important features below.
Online Booking
Payment Processing
Client Management
Email and Text Marketing
Analytics and Reporting
Best Yoga Studio Management Software
When it comes to shopping for the best yoga studio software, keep in mind that not all businesses are looking for or require the same thing. Some yoga instructors may already have a large client base and marketing team and just need help with a booking system. Other yoga instructors may want to grow their business in the virtual space, so a yoga studio software that places an emphasis on virtual yoga will be key.
For most though, an all-in-one yoga studio software will give you the best bang for your buck and assist you in ways you may not have even thought of. There is a wide range of options out there, so we’ve broken them up into four buckets and will take a look at a few examples in each category.
All-In-One Yoga Studio Software
Yoga Studio Management Software
Yoga Class Scheduling Software
Virtual Yoga Studio Software
All-In-One Yoga Studio Software
An all-in-one yoga studio software really streamlines your yoga business by keeping everything in a single place. No need to pay a handful of monthly fees for various services that you string together in order to keep your business running. Instead, pay for one service that covers it all, from online booking to marketing to reporting. Below we’ll uncover some of the most comprehensive options on the market.
When it comes to all-in-one yoga management software, OfferingTree is a top contender. This business-in-a-box solution is designed specifically for health and wellness professionals. As a newer option in the market, OfferingTree is less complicated and cumbersome than some of the larger yoga business software alternatives, allowing you to truly customize it to your business and needs.
Some of the major features of OfferingTree include custom branding; website, email, and text marketing; and on-demand content library. No need to schedule a lengthy sales call to learn more. OfferingTree offers a quick on-demand demo that you can watch on your own time. They also provide a free 14-day trial period which includes a quickstart course and guide to ensure you’re set up for success in under an hour. The simplicity of use, extensive list of key features, and affordability positions OfferingTree as one of the best yoga software options out there.
GloFox was founded in 2014 as a complete gym and studio management software with a focus on user experience and business growth. Designed for businesses of all sizes, Glofox aims to simplify the process for both business owners and clients. In addition to online scheduling and member management, Glofox offers easy online payment processing, brand personalization, and self-service check-in.
Based on user feedback, some of the biggest pros of this software are its visual appeal and usability. Setup is straightforward, and the business dashboard gives you the most important tools right at your fingertips. The pricing for Glofox is on the higher end, and some customers have complained of a lack of service support to back up the product. While there is no free trial period, Glofox does offer a free demo to give you an intro to their platform.
Likely the most well-known software for yoga studios and fitness studios alike is Mindbody. Mindbody has been a leader in the space since its founding in 2000, so it has the upper hand when it comes to name recognition and number of users. This is probably the primary benefit to Mindbody – the sheer number of users on their app gives your studio exposure and potential new clients.
Mindbody’s basic Starter package includes class scheduling; business listing on the app; and website, point of sale, and limited reporting. If you’re looking for more advanced features like email and text marketing, reviews, and real-time reporting, expect to pay several hundred dollars per month.
While Mindbody may be one of the best yoga studio management softwares out there, the steep cost is definitely a drawback and may be prohibitive for some. A couple of other common complaints include a lack of quality customer support and not the most user-friendly interface. Mindbody offers a free demo but no trial period to test it out for your business.
This is a women-owned business that was originally made for yoga teachers but has broadened to all wellness professionals. It is a great tool for both solo instructors and studios! Hey Marvelous has four different price tiers, so whether you’re a solo wellness professional just starting or have a network of professionals working with you, this all-in-one management software can meet anyone’s needs in any pricepoint.
Hey Marvelous’ main draw is its simplistic setup and management tools. You can host livestreams, have a course catalog, and sell products with easy monetization capabilities. It can integrate social media profiles like Instagram or other services like Mailchimp so that you don’t have to bounce around different platforms.
Yoga Studio Management Software
If you like the idea of an all-in-one yoga management software but do not need all of the additional features, a general yoga studio management software might be right for your business. The softwares covered in this section all have its unique angle and business proposition, but since they aren’t an all-in-one solution, expect to put in some manual labor or integrate other solutions.
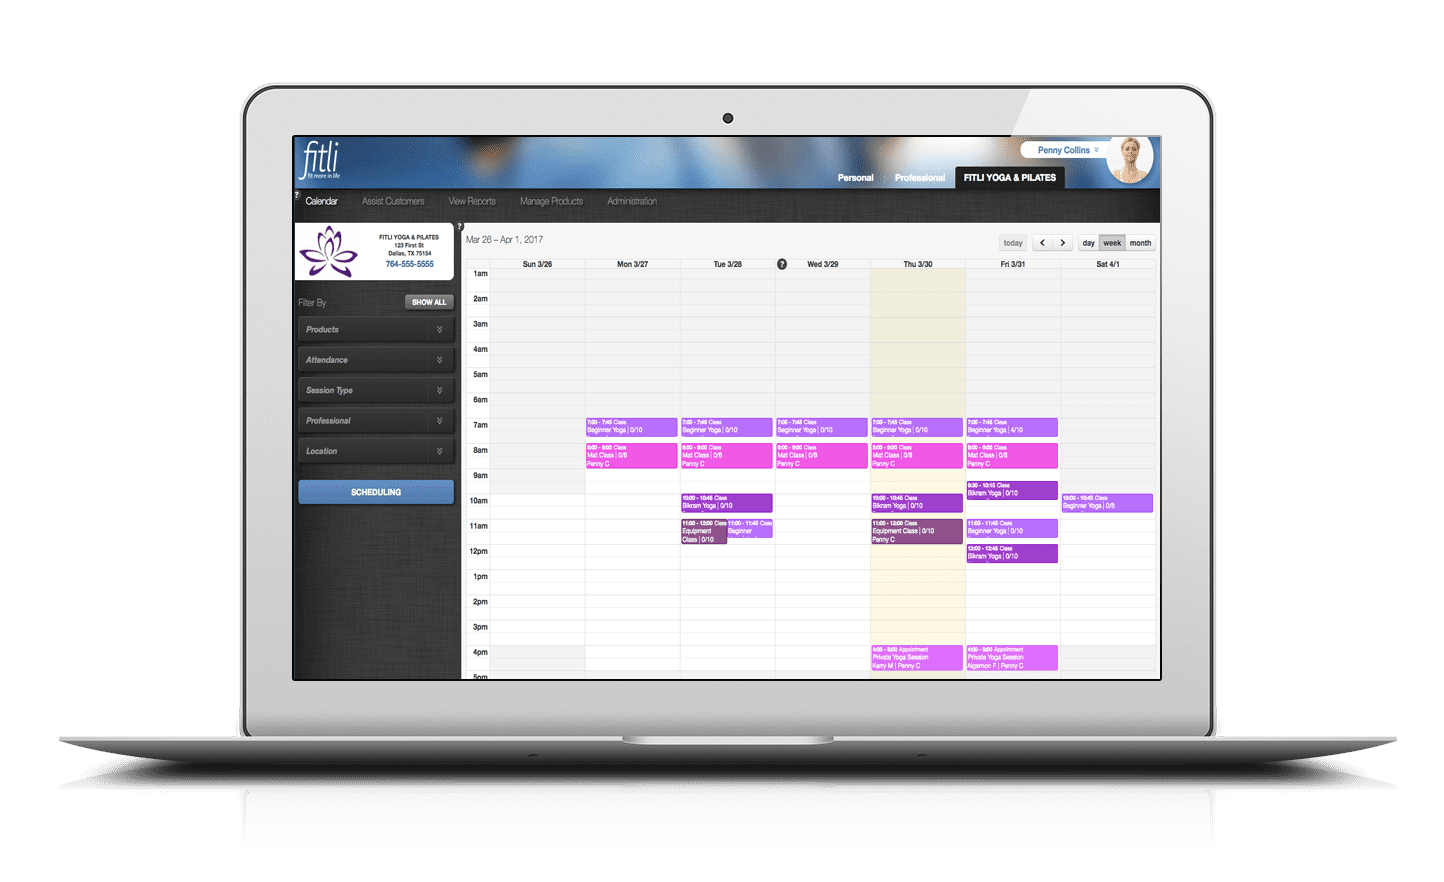
Fitli is a fitness management software that offers a range of features for your business. Clients can book unlimited classes and workshops, rate and review, and purchase single classes and memberships. They also offer client management, employee management, and basic reporting.
What’s lacking with Fitli is a personal, branded website with marketing capabilities and virtual class options. With four membership levels (all with a 30-day free trial) and flexible payment options, you can find the plan that makes the most sense for your business needs.
Yoga Trail is an online network for yogis and instructors. Students can search for classes, events, and workshops in their area and book directly on the Yoga Trail website. Your business listing will include a brief description of your offerings (styles of yoga and experience levels served), your certifications, client reviews, and upcoming classes.
This is one of the most pared-down yoga studio management options, and you will notice it when comparing the user experience and overall features. Yoga Trail gives new and seasoned business owners alike a platform to find and retain clients without breaking the budget, but expect some added work on your end since this isn’t a complete management tool.
Yoga Class Scheduling Software
As any yoga teacher knows, an easy booking system is vital to get clients in your door and coming back day after day. Some of the studio management softwares are built with the primary goal of helping you get clients scheduled without the extensive range of other features. Most are not yoga or even fitness specific, as scheduling is necessary for businesses of all types. Let’s take a look at some of the best booking systems for yoga studios as recommended by the yoga community.
Marketing itself as a user-friendly scheduling assistant for businesses of all kinds, Acuity Scheduling is a Squarespace company that automates the process of getting clients scheduled. Your clients will be able to make payments, easily sign up for classes, cancel or reschedule classes, and receive automated reminder messages. It does also integrate with Zoom and Google Meet if you plan to teach any online classes.
At an affordable price point, it’s a good option for your scheduling needs, and you can try it out for free for 7 days. If you’re looking for a more comprehensive yoga business management software, Acuity Scheduling might not be the product for you. Since it does not have all of the tools and features that an all-in-one yoga studio software offers, expect to integrate multiple products in order to get that complete solution for your business.
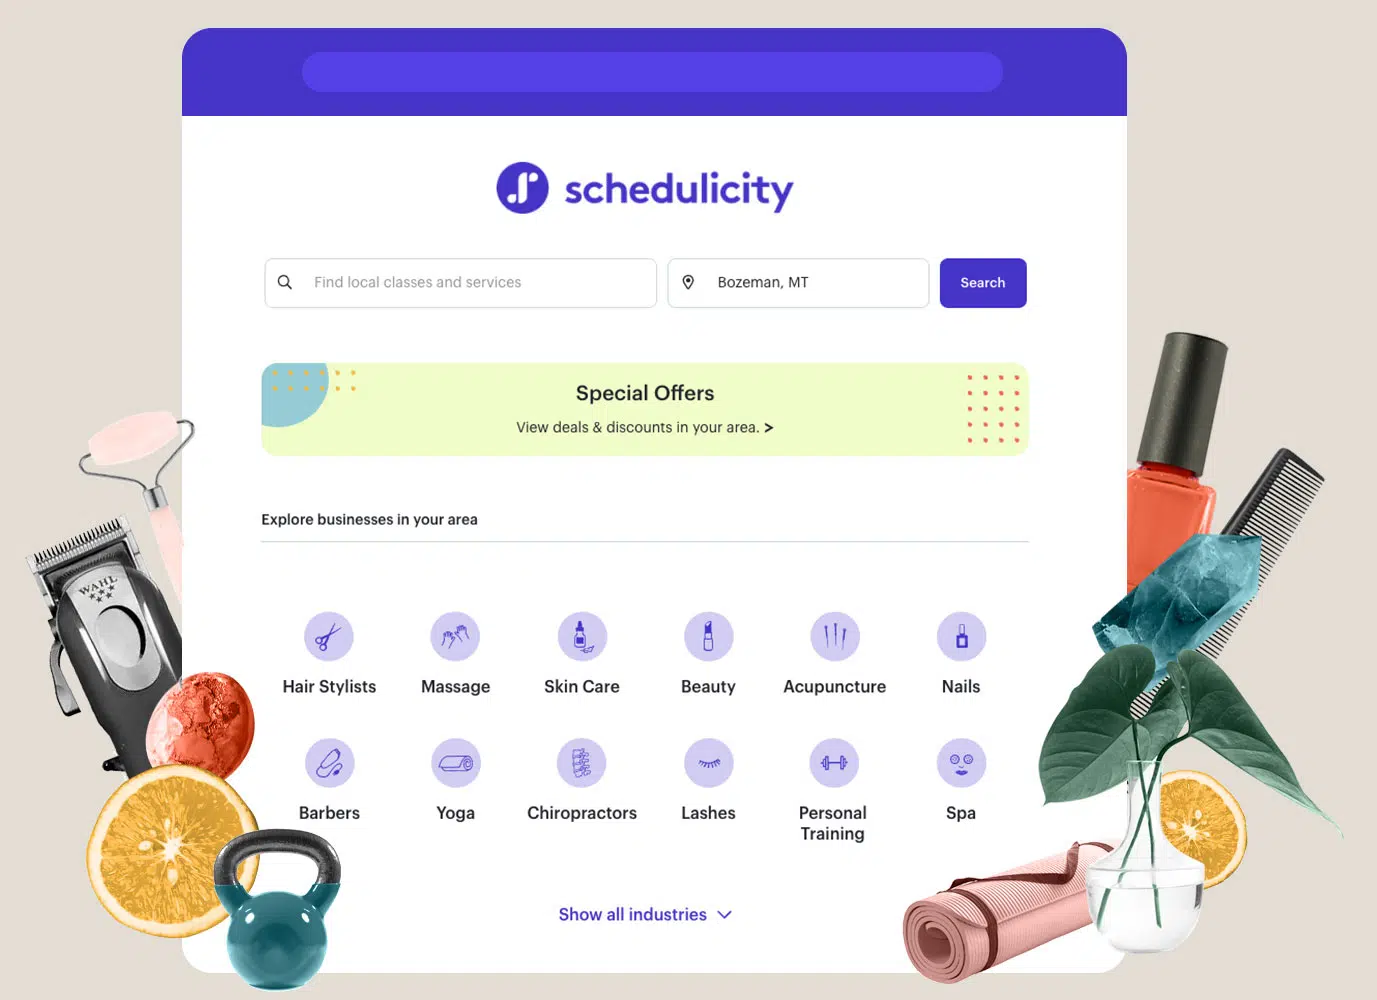
Another scheduling option not specifically designed for yoga studios, Schedulicity offers a free basic plan, but you’ll pay for all of the add-ons. Their ease of use and setup makes scheduling effortless for clients and small business owners alike. One unique offering is the ability for clients to book classes with friends, bringing more people to your classes. They also have a range of courses available on their website, all aimed at helping small businesses grow.
It is missing some automated features for scheduling like appointment text reminders and automated billing on the basic plan, and if you plan to have more than 10 bookings per month, you’ll need to pay. You’ll also likely need to stack additional software for a complete management tool.
A powerful scheduling software for service-based businesses with any type of scheduling need, SimplyBook.Me offers a decent free version, but if you have more than one instructor, you’ll need to upgrade to a paid plan. The most basic paid plan includes online booking for up to 5 instructors, point of sale, and directory listing.
It’s a good tool if you’re just starting out and don’t want or need all of the bells and whistles that an all–in–one yoga software provides. They offer a free 14-day trial period with up to 50 bookings, so you can test it out first to see if it’s right for your business.
Virtual Yoga Studio Software
No matter what type of business you run, diversifying your offerings and revenue is crucial. This is especially true for yoga studios that have been around for the past couple of years. Studios that successfully pivoted to a virtual model fared better than those that didn’t. We’ve learned that consumers like the convenience of the virtual model, so even if you are primarily an in-studio business, why not try teaching a virtual class a few times per month? The following yoga studio management softwares have a robust teaching model just for the virtual world.
WellnessLiving is a complete solution for managing your wellness business with some standout features for virtual classes. The built-in FitLIVE and FitVID eliminate the need to integrate with third-party video communication services. FitLIVE manages all aspects of your virtual live classes, while FitVID allows you to store an entire library of yoga content for your clients.
WellnessLiving is often compared to Mindbody for its range of features but is a more reasonably priced option. Online booking, client management, payment processing, and more are all included in their Starter Plan. Still, if you need payroll reporting or marketing automation, you’ll need to upgrade to a higher tier. WellnessLiving doesn’t offer a free trial, but you can request a demo to see more.
For solo instructors, Vagaro’s platform offers an affordable solution, and their online marketplace may bring new traffic to your yoga business. Primarily marketed towards salons and spas, users of their website and app can utilize the search function to find services nearby.
Vagaro’s 30-day trial period is one of the most generous out there. Online scheduling, email marketing, automated appointment reminders, and invoicing are all included. If you’d like more advanced capabilities or have more than one instructor, you’ll have to pay for add-ons. Vagaro allows for simple live streaming of your yoga classes, with automated integration that links with the booking and payment system.
One of the few studio management softwares dedicated solely to yoga, Momoyoga also offers a 30-day no strings attached trial period. In addition to online booking for yoga classes, payments, and website integration, Momoyoga makes it easy to teach yoga virtually. You aren’t limited to a single video streaming service for your live classes; Momoyoga works with Zoom, Google Meet, YouTube, and more.
The recently added Momoyoga Video on Demand allows you to create and store a collection of pre-recorded classes for your clients to take advantage of. Momoyoga has truly thought of it all when it comes to virtual yoga. They even offer the ability to teach hybrid yoga classes, so you can satisfy all of your clients’ preferences.
Try A Free Trial Of OfferingTree’s All-In-One Yoga Software!
A note from Rachel: You might already know that I have an OfferingTree site (you can check it out here) that hosts my online content, and I love the software because it’s easy to use, has great support, and manages all my needs at a super reasonable price. I love that it easily manages memberships for and drop in’s for my live classes and enables me to archive and sell recordings on my store.
And in case you didn’t already know, the team behind OfferingTree are yoga and meditation teachers plus software engineers. Because of their knowledge of the wellness industry, they are on a genuine mission to improve the work/life balance of yoga teachers and studios by making the software as easy to use and functional as they can! YAY!
To try out an OfferingTree site for free (no credit card required), click here to set up your 14-day free trial (you’ll also get 50% off your first three months of a monthly plan/15% off an annual plan with OfferingTree if you continue to set up a paid plan!)
If you’re considering running a yoga teacher training, you need to consider how much you will pay your yoga teacher trainers – or associate faculty. Unless you’re teaching the whole training yourself, your faculty fees will probably be the largest expense that you have. And of course, faculty can make or break the quality and experience of your yoga teacher training and the student experience. So let’s take a look!
Yoga Teacher Trainer Roles
Once you have selected your faculty (based on their skill, emotional IQ, and professional responsibility), you will want to consider the role that they are playing your yoga teacher training.
Is your yoga teacher training bringing and teaching their own material, or are they teaching yours?
How much of the program (what percentage) are they teaching?
Are they part of your Yoga Alliance faculty or credentialing organization (i n other words, do you depend on them teaching to maintain your credentials with your registration body)?
Will the faculty help with marketing (getting students into the program through announcements, social media posts, and being a player in marketing efforts)?
My personal preference is that yoga teacher trainers – unless they are teaching a very specific subject – teach your curriculum rather than their own. I am a fan of studios and teachers owning all the material in their own yoga teacher training so that they are not reliant on an outside individual for the quality of their training. Trainers will of course add their own flair and voice to any subject that they are teaching, but you want to have the rights to your own manual and materials so that if your faculty leaves the studio, you don’t lose your training.
Payrates for Yoga Teacher Trainers
You can pay a yoga teacher trainer in two essential ways:
by the hour,
with a percentage of the training revenue. For example, if you have two faculty members that are teaching the program, you may think it’s a good idea to pay each of them 25% of the revenue, and the studio keeps 50%.
I usually suggest that you pay a trainer by the hour, as then you can estimate your own training expenses and revenue more accurately. I have also found that the burden for marketing your YTT (and of course other expenses) will generally fall onto the shoulders of the hosting studio. While you can implement referral ideas (hey, for every student you personally bring in, you get $100!), this can be challenging because students usually attend a YTT for a variety of reasons rather than simply for one faculty member.
Pay by Hour
Payrates per hour for trainers can range.
If you are providing the lesson plans and all the materials, then you may pay your trainers $50-$70 per hour. If someone teaches all 200 hours, the minimum they should walk away with would be 10K ($50/hour). Generally, YTT time should pay more than that teacher’s class rate, as it requires a higher degree of skill and knowledge. However, if you have experienced teachers who are using their own material, then you may pay them up to $125-$150/ hour.
You may also consider having YTT assistants who are learning the ropes whom you pay at lower rates. For example, you may pay an aspiring teacher trainer $15-$25/hour to assist the training ~ or even require that they take the training once for free as a student in order to learn the content ~ with the expectation that when they can pull their own weight, they will earn a higher wage.
200 classroom hours, paying your fairly experienced lead trainer $75/hour = $15,000
Your revenue for 10 students @$3000/student = $30,000
In this scenario, you’d be paying your faculty 50% of the revenue
After you pay for your space rental, manual printings, Yoga Alliance fees, processing fees, etc, you’d probably net 8-10K. However, for every student that you bring in, you’d have another 3K of revenue.
You could elect to do bonuses to incentivize trainers to promote the YTT while covering your own investment. For example, the trainer could earn one fee for 8-12 students, a higher rate for 13-18 students, and an even higher rate for 19-25 students.
Pay by percentage
The benefit of a percentage split is that everyone is taking a risk, and everyone is invested. However, as I mentioned above, my experience has been that the studio usually bears the marketing burden.
If you are interested in doing a percentage split, consider the following
Make sure that you are doing a split of the net, not the gross. In other words, carefully look at your expenditures and make sure that you are accounting for them (rental if needed, processing fees, marketing costs, manual printing) and for the trainer, perhaps their transport costs of (if they’re out of town), their lodging.
A percentage split makes more sense if the trainer is bringing all the intellectual property and training materials with them. In other words, if you’re partnering with a trainer and they are providing everything and you’re just providing the space, community, and registration support, then you’d likely do a percentage split of 70/30, 65/35 or 60/30 (in their favor). After all, they’re bringing all the goodies. Just make sure that you’re not taking too much of a hit on revenue in the form of cancelling classes, etc.
Contracts
Whichever way you go, have a contract. Have a clear minimum number of students that you agree must be signed up by a certain time for the training to run. For example, you may have an agreement that you must have 10 students signed up 14 days before the start date. If faculty is coming in from out of town, make sure you have cancellation clauses for their expenses (transportation, accommodation) or ensure that they’ve purchased trip insurance. Now, you could choose to adjust these last minute, but it’s important to have your benchmarks set and agreed upon in advance so you are not caught be surprise.
Number of Trainers
If you are paying your trainers a decent rate (say, $75/hour), then you’ll probably only want one teaching a time ~ unless you have over 20 students. In our example above, if you were paying two teachers to be there the whole 200 hours at $75/hour, it would cost you 30K. Schedule your trainers judiciously. You may have a lead trainer and assistant there the whole time, or you may have two trainers there at critical times (for example, the welcome at the start of the training as well as the final assessment and graduation).
Be savvy about how you schedule your trainers and when so that you are very clear on what you will be paying every hour of the training.
Final Thoughts
Your trainers will make or break the training. Choose them carefully (see my blog here about selecting faculty. And treat them well. Create clear contracts and make sure they feel good about their relationship with you. Pay them as well as you can, and be fair and transparent in how you are arriving at payrates (it can even be useful to share your budget with them so that they understand your expenses). Teaching a YTT is a great opportunity for them, as it creates an opportunity to enjoy a more substantial payrate. And having wonderful faculty represent your YTT is great for you, as they will be a personalized expression of your brand and your business. When this relationship is entered thoughtfully and respectfully, it creates a marvellous win win for everyone: you, the trainer, and your students.
We’ve all been going online with our yoga teacher trainings through COVID. But now that restrictions are easing up, what do we do now? Do we go back to completely in-person, stay with the hybrid, or stay completely online…and if so, what are best practices?
1. Know Your Audience
Step One in figuring out if and how to leverage online content is to know your students. While doing part of your yoga teacher training online may seem like a good idea, it’s best to step back first and consider who your students are. Here are some questions to ask:
Are my students comfortable with online technology (zoom and the like)?
Do my students have the materials they need at home (props, etc.) to do part of their work online?
Are my students local (making it easy to come into the studio) or far away (making doing work work online more attractive)?
What appeals more to your students learning style? Do they need in-person touch points, or can they work independently?
2. Know Your Content
If you elect to teach your entire course online, your students will not be evaluated in-person, nor can they easily develop in-person teaching skills. After all, it’s quite a different experience to teach on Zoom than to teach in a studio with real students. It’s important to consider the skillset you need your students to demonstrate in order to graduate successfully. If teaching live and in-person is an important aspect of your curriculum, then teaching live and in-person needs to be part of the experience.
Also, certain content cannot effectively be taught online. Hands on assists, for example. You simply need in-person feedback to teach this kind of skill.
On the other hand, there is some content that is excellent to teach online ~ and in fact, may even be better online than in person. More cognitive tasks such as sequencing exercises, worksheets, philosophical discussions, ethics discussions can all be taught online effectively.
Understanding what needs to be taught in person – and what could be taught well virtually – will give you a better idea of how much of your content would be appropriate for online delivery.
3. Know Your Assessments
It’s far easier to assess students live (whether on Zoom or in-person) than to assess their teaching through recordings. For one, other students can also observe the assessment, which gives them valuable insight into evaluating and honing their own skills. Also, it’s a lot better to give your trainees immediate, “just in time” feedback to students so that they can integrate adjustments in the moment. It’s not as easy for them to integrate feedback that comes much later in time. Also, it can take a lot of YOUR time to review videos for each student and to meet with them; usually it’s faster and more effective to evaluate them in person. For this reason, it can be helpful to have your assessments delivered in person.
4. Consider Faculty and Peer Interaction
One of the best parts of a teacher training is connecting with peers and the faculty. Many students take a yoga teacher training in part because they get to connect with faculty more closely. If you are teaching part of your training online, then take time to consider how you can also create community and connection virtually. Tactics such as creating study groups, having online mentorship meetings, hosting online discussion forums, and having shared projects can all increase student interaction, which can both increase learning as well as motivation.
Also, you need to know your faculty. Can your faculty handle the technical requirements of online delivery?
The Bottom Line
Generally speaking, a hybrid yoga teacher training program (partially online and partially in-person) can give you the best of both worlds. You can put certain lessons online (either pre-recorded or synchronous via Zoom) that would benefit from online delivery. Putting some content online can be helpful because:
Students and trainers will have more flexibility with timing,
Reduces commute time,
When content is pre-recorded, you have given students access to a library of resources that they can access anytime,
Some content is even better taught online than in person.
At the same time, you can leverage your in-person time for the content that is best served by being taught in real life, such as:
Practice teaching,
Assessments,
Applied anatomy,
Teacher presence and body language,
Demonstrations,
Hands on assists.
It’s a brave new world! By being savvy about how you leverage our new online capabilities, you can create a yoga teacher training that is effective, engaging, and transformational.
Inviting other teachers to participate in your training can be a great way to share expertise, entice a new population of students, and off-load some of your own work. However, there are some drawbacks to consider and you need to choose your partners wisely.
Let’s look at the pro’s and con’s.
Pro’s of Collaboration
Have an expert share their personal passion
Off-load work of content creation
Off-load work of facilitation/ teaching
Offer different points of view in your training
Different faculty may appeal to different students
Different faculty offers may widen your marketing funnel to new students
Con’s of Collaboration
They may have a difficult schedule / not be available when you need
You may not own the material they present (unless they use your material)
You may not own the rights to the handouts they provide
They may cancel and leave you in a bind
They may contradict your teaching ideology in the classroom/ confuse the students/ use different language or vocabulary then you do
You are paying another person (expense)
If you’re running a retreat, it’s more expensive to bring them with you
Avenues of Collaboration
When you’re running a yoga teacher training, there are several ways that you may choose to collaborate with another trainer. Let’s look at the options.
Training Partner: you’re in it together! The training is your shared love child. You both create and own the whole thing.
Trainer: you are hiring them to teach YOUR material. You create it, they teach it.
Outside Faculty: experts in a subject. They come prepared to teach with their own material, and they own all the content.
Let’s look more deeply at each of these and the implications.
Level of Involvement
Implications
Training Partner
A training partner is a full partner in creating the course with you understands and shares your course vision. They probably teach the course with you (or teach a significant portion) and they probably belongs to Yoga Alliance or your credentialing organization as an E-RYT (if you choose to register). You’re on the same page in terms of your teaching principles (values, how to cue, use of language, how to sequence, etc.) and you are okay spending a lot of time with them.
A training partner will own the copyright for the course with you (unless you pay them for their work and have a legal contract otherwise). You’re probably splitting the training profits with them rather than paying them an hourly fee. You both “run” the training. You’ll have to figure out how to manage administration and registration duties (the behind the scene work that goes into creating a YTT) They likely need to be involved from beginning so that the content is cohesive and makes sense. You’re stuck with them long term as business partners. You must be on same page and crystal clear in terms of how you teach and the ideology of your training so that your students aren’t confused and the training is consistent. This is a good option if you have a business partner / very like minded yogi, you want to collaborate, and you’re in it for the long-haul.
Trainer
A trainer is a skilled “gun for hire:” you pay them come in and teach your course content and use your material. They may belong to Yoga Alliance as an E-RYT (if you choose to register ~ or whatever your credentialing organization is), and you’re on the same page in terms of your teaching principles (values, how to cue, how to sequence).
They do NOT own your content. You Do. They are teaching your material for you. You’re probably paying them an hourly fee rather than splitting profits. Unless you took your teacher training with them, you may have to train them to make sure they understand your course material, values, and your course concepts. This is a good option if you already have a training and you want others to be able to teach it (for example, a studio with ambassadors), or, if you’re willing to do the legwork to create your training yourself.
Special Faculty
Specialists in a subject area are a “gun for hire,” and you pay them to teach THEIR material they bring handouts, etc for students. They may not belong to Yoga Alliance.
They own their own content likely paid by the hour great for diversifying your faculty roster and teaching their own material. They are great for “niche” subjects such as philosophy, pranayama, ayurveda that don’t impact fundamental teaching methodology subjects like cuing and sequencing.
Too Many Cooks
There’s a seductive gray area where you may think, “But Amanda is so good at sequencing…I’ll just have her come in and teach a section.”
You can have too many cooks in the kitchen.
Remember, this training is about extending YOUR BRAND and YOUR VISION. And anyone who is teaching in your training must be totally on board with your teaching methodology. To deliver a consistent and effective training experience to your students, your teacher trainers must speak the same language, teach consistent ideas, and demonstrate the same teaching techniques.
Otherwise, you’re going to start to hear, “But Amanda said that we could teach handstand right before Savasana!” Or other such things that may conflict with your ideas of teaching. It’s like parents contracting each other: it will confuse your students and undermine the training experience.
Best Practice: if you want to include additional “special faculty” in your training, outsource specialized topics that don’t impact your core teachings and training vision. Or be prepared to train your faculty to ensure that everyone is on board with the core ideas of your training methodology.
US Yoga Alliance and Faculty
If you want to register your course with YA (or another organization), then you – or a couple of your trainers – need the appropriate credentials. Before you choose faculty, it’s useful to ensure that they can meet these requirements.
Check with your organization’s requirements in advance to ensure that your trainers will meet their requirements.
Teacher Trainers: It’s More Than Just Teaching
Just because someone is a great yoga teacher, that does not necessarily mean that they are a great teacher trainer.
Let’s look at the qualities you will want in a teacher trainer:
Team Player: ability to be flexible, take direction, and work well with others ~ like your or their fellow faculty.
Emotional intelligence and positivity: ability to hold space as a leader for a group of students who may be emotional and vulnerable. They validate students’ experiences and support their learning rather than criticizing or diminishing. Ability to manage group dynamics.
Responsible and organized, good time management: ability to show up early, manage a space, deal with handouts and some administrative duties like attendance, and organize assessments. Ability to manage their time and stay on task.
Committed to continuing education: someone who is interested and passionate about learning and sharing.
Ability to put the students’ experience first (rather than needing to position themselves as experts).
Clear communication: ability to relay complex ideas clearly and simply so that students can learn.
Marketing: will this faculty help you promote your training?
Your primary faculty will need to act like den mama’s and papa’s; in addition to having a clear understanding of the content, they must be able to help to manage the emotional rollercoaster ride of a yoga teacher training. For many teacher trainee’s, teaching is scary! Your faculty should be positive and supportive forces for the trainees growth.
Final Thoughts
When you are creating your yoga teacher training, it can sometimes be easy to partner with someone early…and regret it later. Before you agree to collaborate, think practically about the future of your business. Who owns the training? What does it look like if this other person goes away? What does it look like if there is a divergence or a falling out?
There are many ways to partner with others, but you want to be savvy and bullet proof your business. Creating a teacher training is a big investment and time and money. Some patient forethought about your faculty can help ensure that you create a training that is not only an amazing experience for your students, but a lucrative long-term offering for your business.
The Financial Realities of Running a Yoga Teacher Training
One of the scariest parts of launching a teacher training is the paralyzing thought: “Will I make enough money?” Creating (or purchasing) a 200 hour teacher training is a big investment, and it’s wise to do a little legwork in advance to have a sense in advance of your return on investment. This process can give you a sense of how you might approach planning a ytt, and it will also give you sense of the minimum number of students that you need to run the training successfully.
Your Revenue
First let’s take a look at your expected revenue.
Most 200 hour yoga teacher training have a price tag of about $3,000 – $3,300 per student. (For those of you thinking, “Should I charge less for an online or hybrid program?” my firm answer is NO. When it’s well-created, an online program provides just as much quality as an in-person training.)
You will likely run some early bird sales (offer discounts for early sign ups), and you will also be charged about 3% in credit card processing fees on your transactions, so let’s take the “worst case scenario” and say that ultimately you earn $2600 per student.
I would suggest that you run a yoga teacher training with a minimum of 6 students. So let’s see how the revenue would play out:
6 students x $2,600 = $15,600
7 students x $2,600 = $18,200
8 students x $2,600 = $20,800
9 students x $2,600 = $23,400
10 students x $2,600 = $26,000
11 students x $2600 = $28,600
12 students x $2,600 = $31,200
Obviously that could be a good chunk of change for your studio or business. But to really understand how much you would make, we have to look at your expenses.
Your Expenses
Expenses for your yoga teacher include the following:
Paying faculty
Space rental
Printing yoga teacher training student manuals
Marketing
Faculty
Of these, the cost of paying your faculty is the most expensive. If you are planning to bring in other teachers to instruct with you, then you want to be strategic about who you bring on board for faculty. For a variety of reasons, I would suggest paying your faculty by the hour rather than profit sharing, though you may wish to give them a bonus for students sign ups to incentive them to help market the training.
Teacher training rates vary wildly depending on a few factors:
If the trainer is providing their own material (handouts etc) or they are teaching yours
Their experience
Your geographic location and current price point for teaching pay rates
As a very rough ballpark, let’s say that a new teacher trainer may earn $40/hour while a very experienced teacher trainer may earn $100/ hour. That is quite a range, but you could generally think about paying the teacher 50% more than their class teaching rate.
For the sake of our sample budget, we’ll split the difference and assume you are paying your teacher trainer $70/hour. We will also assume that you are paying out all of these training hours. (If YOU teach the training, we’ll assume you are paying yourself $70/hour).
Faculty expenses = $14,000
Space Rental
If you own your own studio, you will not have to worry about these fees as you can schedule the yoga teacher training around your current classes. But if you are a solo teacher, you will likely need to rent a space to offer your training. Space rentals of course vary, but let’s say that – worst case scenario – you rent a space for $20/hour. As a worst case scenario, we’ll assume you are renting a studio for all 200 hours (rather than doing any of the program online).
$20 * 200 = $4,000
Printing Student Manuals
These days, you may just give your students a PDF and ask them to print out the manuals themselves. But just in case you decide to print out a 500-page black and white manual, you can estimate it will cost roughly $50/student.
6 students x $50 = $300
7 students x $50 = $350
8 students x $50 = $400
9 students x $50 = $450
10 students x $50 = $500
11 students x $50 = $550
12 students x $50 = $600
Marketing
For a yoga teacher training, the best marketing is often organic and unpaid (newsletters, website, social media posts, etc). If you do invest in paid marketing (Facebook promotions, boosting posts, etc.) I usually would suggest a more modest budget to start.
For the sake of our sample budget, let’s say you spend $500 on marketing.
Other Expenses
Other expenses that you may wish to include:
Processing fees (we calculated these and discounted them from the revenue, above)
Travel
Utilities at your studio
Admin time (registering and communicating with students)
Insurance (which you’ve probably likely paid as teacher/studio already)
The Bottom Line
So let’s take a look at where we’ve landed.
The “Worst Case Scenario”
This sample budget is looking at the “worst case” expenses. I’m assuming that you are paying a trainer (rather than teaching the training yourself), renting a space, doing the entire training in person (rather than leveraging the ability to teach some of it online), and printing out a substantial manual.
Faculty: $14,000
Space Rental: $4,000
Student Manuals (assume 6 students): $300
Marketing: $500
Total Expenses: $18,800
You pretty much break even at 7 students. For every additional student, your business will earn an additional $2550 in profit.
If you look at your revenue, you’ll see that this means that you need to have 8 students in order for the business to break even on your training. But the benefits of running the training (even at break even) are substantial: you’ve given your faculty a substantial earning opportunity, increased your brand, and connected with – and supported – your community.
The “Best Case Scenario”
Let’s look at another scenario, in which you are teaching the training yourself, do not need to rent out a studio space, and give the students a PDF of the manual rather than printing them yourself.
Faculty: $0 (rather than paying yourself an hourly, you will pay yourself whatever the profit is for the program)
Space Rental: $0
Student Manuals: $0
Marketing: $500
Total Expenses: $500
Profit starts with 1 student. In this case, if you have six students, you will earn $15,100 and increase profit $2,600 for every additional student.
Final Thoughts
Every studio is different, and it’s important to assess your own budgetary needs so that you can weigh the pro’s and con’s of offering a teacher training. Questions you may wish to ask:
Are there any unique expenses for my situation that I need to consider (for example, taking time off of work)?
Is there an appetite for teacher training in my community? (Will students sign up? Have students expressed an interest?)
Do I have the bandwidth to create (or resources to purchase) a 200 hour yoga teacher training?
Taking the leap to offering a yoga teacher training can at first feel daunting, but by creating a budget, you are better able to ascertain whether offering a training is a wise investment for your particular situation.
And – this probably goes without saying – I am a huge fan of yoga teacher trainings, for reasons far beyond their potential to be profitable. Offering a YTT can become a pathway to elevating yourself as a leader in the community and enriching your own understanding of the practice. They are often a calling to “step up” and take our own teaching and leadership skills to the next level. In addition, teacher trainings provide an opportunity to connect deeply with your community and students, and to create an inspirational environment for growth and change.
If you’re interested in offering a yoga teacher training, but aren’t sure where to start, feel free to connect with me for a virtual coffee 🙂
Given the challenges of meeting in person during COVID, most yoga teacher trainings have had to move their trainings online in order to accommodate social distancing. Yoga Alliance – notoriously sticky about allowing for online course hours – is allowing schools to teach online through the end of 2020 as a way of supporting studios to keep teaching during this strange time.
However, part of the magic of a yoga teacher training is that it is in person. So how do you take a course that has been designed to be face-to face and move it into the online space?
Take a deep breath, studios and teachers! Here are five tips to help you out.
1. Livestreaming Tips
There are actually some nice benefits to livestreaming your yoga teacher training rather than teaching it in person:
You can require students to keep the video on (make this mandatory), which keeps them from hiding in the “back of class.”
You can record the session so students can have access to the material again. Yay!
You can share your screen to easily present online resources, such as presentations, images, videos and other fun links.
If you’re using Zoom, you can use the “breakout room” feature to have students do activities together as a smaller group – which can mimic in-class activities.
When you’re livestreaming, I highly suggest that (like your classroom experience) you vary your activities. Lecture a bit, then have students use break out rooms to do activities or reflect in a smaller group, lead practices, get them on their feet, have them take a poll, have them do an online quiz on the material you just covered, show them online presentations or other relevant and curated material.
As a best practice, restrict your “lectures” to small chunks. I recommend that you talk for no more than six minutes before having students engage or work with your material. Also, whenever possible, engage them students actively. Put the onus on them to do activities, come up with solutions, or even present on a topic that they have researched.
2. Practice Video Tips
The greatest challenge to taking a yoga teacher training online is that students aren’t teaching other humans in person. If you want someone to learn to teach an in person yoga class, then they need to practice teaching an in person yoga class. Teaching on Zoom is not the same, because you don’t have to “work” the room the same way, see students, use your physical body language, deliver as many verbal assists, do hands on assists or hold space.
Your greatest challenge in delivering an online yoga teacher training is addressing these limitations. Here are some ideas:
If possible, meet in person for practice teaching while social distancing. You can put a mat 6′ from someone else. You can meet in smaller groups. Though the student can’t walk around the room in the same way, the trainer can assess the student’s body language and vocal projection.
Have students practice teach in environments that mimic a real classroom. Have them teach family members, or put down mats or objects to represent students in a classroom. The more “real life” their practice teaching can be, the better equipped they will be to teach when they leave your training.
Use video. Have students record and submit assessments to the trainer, as well as practice teach live to your online group. When they record themselves, they will invariably wind up practicing a few times before they submit their recording – bonus!
Provide clear rubrics that detail what skills students need to demonstrate in order to achieve success. Not only can you use these rubrics to assess their practice teaching, they can use them to record themselves and self-assess, or assess their peers.
Let’s be honest: livestreaming an entire 200-hour yoga teacher training can be tiring. Are there already built resources that you can use to support the student experience outside of livestream hours? YouTube videos, recorded classes from your studio, articles from reputable magazines, assigned reading in your manual?
Now, there is a HUGE caveat to this: all resources must directly support the learning objectives of your teacher training. If you choose to let students use outside resources – or you use them during class time – you must be very clear that they serve your learning intention, the training’s vision, and are very clear. Putting together a bunch of disparate resources because they’re interesting won’t work; carefully curating resources that directly support your training objectives does.
4. Plan For Interaction
This may seem obvious – and it’s actually less relevant to livestreamed yoga teacher trainings than to asynchronous trainings – but it’s important to deliberately create opportunities for student-student interaction and faculty-student interaction.
For student-student interaction, consider putting students in buddies, small study groups, assigning group projects/ activities, having peer-peer practice teaching assessments, or integrating discussion forums.
For faculty-student interaction, consider personal check ins, small group mentorship, email availability for questions or “office hours,” or Q&A forums (for example, create a Google Site). Also, be very clear upfront how students can get in touch with faculty for questions and what the response time should be.
5. Assess
Assess, assess, assess. Remember, the training isn’t about what you tell your students, it’s about what they can do. Regularly provide opportunities to assess their skills and give them personalized feedback. Covering less material and incorporating practice/ feedback is far better than covering a ton of different material. By assessing your students regularly – and giving them real tasks – you will set them up for success, online and off.
As everyone looks for ways to connect with their communities, I wanted to share some tips I’ve learned along the way about recording and uploading an online yoga class. Make sure to check out Five Ways To To Livesteam An Online Yoga Class and Five Best Practices: How To Teach An Online Yoga Class, where I cover the technical aspects of space, sounds, lighting, teacher presence, etc. Those elements remain the same, whether you’re recording or livestreaming, and that’s a good resource to check out.
In this blog, I’m going to look at how you shoot, edit, record, and upload classes, which is a slightly different animal than livestreaming. I am also going to assume that you are a DIY’er, and may not have the budget to have a video team on your payroll.
Before we jump in, let’s look at of livestreaming versus recording.
Livestreaming
Less time commitment (the work is over once your stop streaming)
More “in the moment feel” (you have to welcome a little messiness and screw ups)
The easiest way to shoot your class these days is on your phone. The internal videocam on your computer just won’t have enough power, unless you buy an external webcam. Nowadays you can shoot as high as 4K on your phone. However, I don’t think 4K is necessary for your average class video just because it’ll eat up a lot of storage space on your phone and computer. Personally, I record in 1080p HD at 30 fps (frames per second). If you’re an Apple gal like me, go to Settings, Camera, then “Record Video” to see what you’re setting is at. When we record, we’re always balancing video quality, with “How much damn space will this file take up??” Apple has an excellent compressor, so you can get high quality video at not too high a storage space price.
Now, if you have a video recorder, you can shoot on that as well, you’ll just have to off-load your video footage to your computer afterwards.
You must have good audio. Your students aren’t going to watch your video so much as they are going to listen to it. Bad audio will kill the experience. And if you are recording and uploading, students will expect the audio to be nearly flawless. (For my audio tips, see, Five Best Practices: How To Teach An Online Yoga Class.) Unless you have a wireless body mic, your sound won’t be great because you’re likely demonstrating the class as you go.
However, as a low-cost solution, you could record the visuals of the class for practice (without talking), then record a voice over to replace the audio. It adds some work, but in a pinch, that’ll do. Recording the v/o (voice over) later helps because you can 1. sit next to your mic, and 2. not move.
One Camera Shoot
If you are recording a class, you can edit the footage after you shoot it. Therefore, you get to choose: one camera or two?
If you’re just starting out and don’t want to do a lot of editing, then have one camera. Accept that you will make mistakes or need to do cross-fade cuts if you mess up.
Pro Tip: if you screw up during the class flow, pause. Stay still. Take a breath, then go back a few beats in your “script” and do it again. Later, you can splice those takes together and remove your mistake. And if you’ve stayed really still, when you cut them together, students probably won’t even notice.
Two Camera Shoot
The benefit of shooting on two cameras is that you can go back and easily edit out mistakes. The bummer? More editing.
If you shoot with two cameras, then place one directly in front of you one diagonally to the side. Make sure to check both angles in advance to make sure they capture you (and remember, you’re going to be moving all over the place and lifting your arms over your head, so account for that. We don’t want your hands to get cut off :)).
Pro Tip: when you’re shooting with two cameras and you’ve got them rolling, clap your hands loudly. The clap will show up as a sharp spike in the audio and allow you sync the footage easily if you need to.
I recommend that you shoot your class straight through. Don’t restart the camera unless you really need to. You can note down where you’ve made mistakes if you need, or just assume you’ll be watching all the footage again and will catch the mistakes if you’re editing.
If you prefer to shoot in small bite-sized pieces, you’ll have a lot of video files. In this case, I recommend that you “slate” your videos by holding up a little whiteboard that keeps count of the shots. If you have a lot of videos, editing can get confusing if they’re not well-labelled.
Pro Tip: when you’re recording, speak slowly and leave pauses. Those pauses are gold when you’re editing, as it will allow you to make cuts.
Editing
Candidly, I’m an Apple gal through and through. For easy editing apps, I’d use IMovie. It’s intuitive and plays nicely with your phone videos. You don’t need a lot of bells and whistles to edit a yoga class. If you’re new to editing, then stick with IMovie rather than spending money on Final Cut or Adobe Premiere (good lord, those programs will overwhelm you with options!). If you’re using different software, you may need to export your videos from your IPhoto library in order to edit them. It’s not hard to do, but it may be an extra step.
Pro Tip: There is a phone app for IMovie, but I prefer to edit on my computer as it’s far easier to see what you’re doing.
Tips For Editing
How to edit is beyond the scope of one blog, but let me give you my top tips:
Add a title screen (if you need help adding an intro to your YouTube video, check these guys out at Design Wizard)
Edit out glaring mistakes (by cross fading if you’re on one camera, or by cutting between camera shots if you’re on two)
Record a short (30 second), friendly intro to the video where you tell people generally what you’re going to do, how hard the class is, and let them know if they need any props
If they do need props, give them “home friendly options” in case they don’t have yoga gear. Ie: you can use a scarf instead of a strap. Remember, they’re practicing at home.
Do NOT use music. You probably don’t have the rights to use it. If for some reason you do (musician friend gives it to you), then input it as a second track in editing – obviously don’t record it while you’re recording your video. Or – my preference – create a Spotify playlist and link to it. Students can play it if they want to on their own.
End screen, add ways to stay in touch, why not!
How To Post
If you’re trying to get your work into the world and use it as a “get to know me” tool, then post your content to YouTube. This is where people look for everything. Make sure to use add tags so that your content is searchable.
I recommend creating a graphic thumbnail for your video personally rather than using one that YouTube auto-creates. You can use a free editing software Canva. You want your thumbnail to reflect the content of the video, and also include in nice text what the title is. Check out Yoga With Adrienne on YouTube to see what I mean.
If you want to have a membership site, then obviously you won’t be posting these on YouTube. Vimeo is a great solution for video (unlike YouTube, they don’t stick advertisements in the middle of your content or promote other channels). However you pay for it (Vimeo makes their money off you rather than advertising).
You could turn Vimeo into a membership site by having people pay to get the password, or you could use a platform that manages content and access for you. I’m mostly familiar with leveraging education sites such as Thinkific, Teachable, Kajabi for this purpose, but there are other video management systems, too, like Namastream. If you want to host your videos to your own website, you may need to get around file size upload restrictions.
Pro Tip: If you need to make your videos a smaller file size, a handy tool for is an app called Handbrake.
A wonderful low tech way to share your stuff it to send your subscribers an email with the video link, for example, to a Dropbox file, where they can stream it for themselves.
With so much free content out there, I recommend a combination approach. Post some of your content out there for free so that people can get to know you. However, then you can point students in the direction of your paid content. For example, post 15-minute mini classes on YouTube, then have students who want the 30 or 45 minute class to check out your paid stuff on Vimeo.
Final Thoughts
Whenever you’re filming, choose authenticity over perfection. Your students will want to connect to you because of who you are; not because you can speak perfectly for an hour of class time. Resist the urge to fix everything. Students want to feel the real you. Remember that beyond the camera are real people who are looking to connect, breathe, and feel better!
Questions, comments, resources to share? Put them below!
As we make the transitions to teaching yoga classes online, it’s important to do it well. It’s easy to make a rookie mistake and lose your audience. Whether you are streaming or recording, here are five practical and simple tips for teaching online yoga classes that will make a huge difference in the quality of your offering. Although these tips are designed for live streaming (as we’re not discussing editing yet), they are also useful for those of your who are recording. (For specific tips on livestreaming, check out, “How To Livestream Classes.”)
1.Background
Teach with a clean, spacious, uncluttered background. If you check out our DoYogaWithMe Videos, you’ll see that we take a lot of care to make sure that the background is clear and free of clutter. This is easy to do; pick a wall in your house that has a good amount of space (ideally you want a clear horizontal stripe of at at least 10 feet), then move everything away. You usually won’t teach with a window in the frame because of lighting issues (see point #2), but it really depends on the orientation of your window. I prefer light or white walls when possible to create a clean, airy look. Usually you’ll place your mat horizontally along the wall. A small altar space or nice wall hanging/painting can work, depending on your space. If you have a tripod, outside can work, too.
Key Points:
Clean background
Remove clutter and distracting objects
Place select “yoga” objects in frame if desired
DoYogaWithMe Set Up
2. Lighting
When you shoot, make sure that you don’t have light behind you because it will flood the camera’s sensors and may make you look dark. For this reason, you usually won’t teach with a window in the frame behind you, unless you are sure the light won’t blow out the camera (exceptions: on YouTube, YogawithAdrienne teaches against a window and it looks great). For this reason, you often won’t put a bright lamp in the frame with you, as it may cause you to look darker. You want to be well lit from the front and sides. Natural light can be amazing (if you are opposite a window), as long as you’re teaching in time when the light won’t change dramatically. Although I’m frankly a fan of warm lighting, “daylight” LED lights mimic the sun most closely, so you pop a few of those lights into your house lamps and see how it looks. Newer mobile phones (like the IPhone 11) have amazing cameras and light sensors that can accommodate a wide variety of environments. In yoga, we turn a lot. So before you shoot, do a test shoot in the space where you practice a few differently facing poses to make sure that you don’t go dark when you turn a certain way.
Key Points:
Avoid bright light in the shot with you
Add light from the front and to the sides to make sure you are fully lit and avoid shadows
Daylight can work well if you’re opposite a window
3. Audio, audio, audio
Audio is where most videos fall apart, and this is where you may need to make an investment if you want to do this long term. When students practice with you, their key connection is not visual; it’s audio. Bad audio will be very distracting and cause them to tune out.
There are two key problems: live rooms and teacher movement.
Problem 1: Live Rooms
If you are in a room that is very “live” – ie you have a lot of hard surfaces – the sound will echo and sound poor. It’s very hard to fix after the fact. (Check out my early YouTube videos for a demonstration of this problem). To fix a live room cheaply, take all of the pillows in your house and pile them on hard surfaces to buffer the sound. Hang blankets on walls out of sight of the camera. You want to room to be as “dead” as possible. You know how sound studios have foam stuck to the walls and ceilings? You can also go get some foam padding from Home Depot and put it all over the place. Do a test with your camera to assess your sound before your record or livecast.
Problem 2: Body Movements
Teaching yoga is different from most livecasting in that you need to move and face a bunch of different directions. For this reason, your audio will change (because you’re not always facing the camera). In an ideal world, you use a microphone on your actual body (bonus: this usually eliminates Problem #1 – the “live room” issue- yay!).
Cheap solution: To solve this sound cheaply, use your wireless headphones, like your Apple Air Pods. The bonus is that these will connect directly to your IPhone, usually eliminating challenges with connecting your audio to your phone. Sure, you’ll have them stuck in your ears, but people will be able to hear you clearly.
At around $500 USD, it’s an investment, but worth it in the long run. You can hear that there is a huge difference in sound in my newer videos where I’m moving.
Me teaching with a lavalier
While there are mics out there that will connect directly into your IPhone port (via a lightning port), by getting a simple adapter you can vastly expand your option. The adapter (note the three rings around the plug rather than two) is called a TRS adapter) and it will connect your mic into the headphone jack of your IPhone (or more accurately, it plugs into the headphone jack IPhone adapter that you’re probably familiar with).
Adapter for connecting mic to phone
Using this adapter is not hard, but if you get the wrong one it won’t work. I’m also going to point you in the direction of an amazing resource over on YouTube: Primal Video. They are tech gods with lots of goodies. Here’s a video specifically on mics for mobile phones and adapters if you want to dive into this issue further.
Note on music: to keep audio simple, I’d recommend having your students play their own music (or – fun solution – create a Spotify playlist that is directly catered to your class and prompt your students to start it from home during the class) rather than trying to feed music into your live recording. To start, keep it simple.
And pro tip: if you’re using a mic, the sound is being picked up very close to you (like on your body), so don’t shout to reach the phone 🙂
Key Points:
If possible, use a body mic so that your audio is consistent when you’re moving
If you’re using an external mic, make sure to get the right adapter so that you can plug your mic into your Android or IPhone and it works
Make sure that the room is not too “live” and echo-y, as that is very hard to fix after the fact if you want to record the session for posterity
4. Camera position
Obviously, where you put the camera is important as this will act as your audience’s eyes. You want to shoot in landscape (horizontally). Unless you have a lot of space in front of your mat, you’ll probably want to lay your mat horizontally so that you can see your whole body. You need to test the camera shot to make sure that is it capturing you fully (in other words, your hands don’t get cut off when you reach them overhead).
I’ve done plenty of shoots where I have simply propped my phone up on a bookshelf in order to record. However, I recommend you use a tripod for a few reasons:
It’s soooo much less frustrating to get the position accurately and easily with a tripod
You can angle the phone to get the right shot (if you’re leaning the phone against books, it will tend to shoot up rather than down at you)
You don’t have to worry about the phone down falling mid shot.
My recommendations: get a decent tripod. It’s worth it. You want one that can lift up high enough to capture you straight on (so don’t get a tiny one that’s only for IPhones; get a real one for cameras). Here’s a suggestion (Manfrotto’s compact aluminum tripod), but you have tons of options on Amazon that you can search out. You’ll also purchase an adapter for your tripod so that it can hold your phone. I personally use this Kobra adapter. Again, while you could buy a “tripod for IPhones”, I recommend getting a legit tripod, then just getting the adapter so your phone can attach to it. You’ll get a better product.
Kobra adapter (attaches phone to tripod)
Key Points:
Shoot landscape
Use a tripod if you can
Test to make sure that the camera can capture you in all your poses
5. Teaching presence
Ironically, you can’t rely on your video. I want you to imagine that you are actually teaching through an audio podcast. Here’s why:
Students may not have a big enough computer (or phone) screen to see you clearly
They won’t be able to see you most of the time (for example in forward fold or downward facing dog)
They won’t be able to see if you’re lifting your right or left leg easily (like in class), so you have to be incredibly specific in your cues
You don’t want them to have to move their computer around during their practice to keep watching you
For all these reasons, you must lead your students verbally through the practice impeccably. Be very specific about rights/lefts, cueing directions, and transitions. Do not rely on the visual. It’s a great opportunity to refine your verbal cues.
Also, if you screw up – no apologies! Carry on as you would in a normal class. Cop to any mistakes if you need to, but sally forth without hesitation. Just because it’s video doesn’t mean it has to be perfect, and students love you to be human.
Key Points:
Use impeccable, clear language (don’t rely on video)
Embrace imperfections! Be human and carry on.
Final Notes
It’s going to feel weird if you’re not used to teaching with a camera. Pretend that there is a fun student right behind the lens that is loving everything that you are doing – because there is! Treat the camera as that friendly student, and look at them frequently and directly to check in (particularly at the beginning of class when your virtual audience is probably looking at you). If it helps, tack up a photo of a real student directly behind your camera so that you feel like you’re talking to someone real.
Keep in mind: though it’s mediated by the camera, you’re teaching to real students beyond the lens. Remember them, and enjoy the opportunity to share your teaching.
If you’ve never used tech to go online before, it can seem intimidating. Here are some tips and my favorite tools to get you started easily. In this post, we’re looking at “live” aka “streaming” options, which put you online in the moment. Also, for more info on how to shoot well, check out my tools and tips for “How To Teach Online Yoga Classes.”
1. Facebook Live
Facebook live is great for a quick check in, or live streaming a class or conversation in real time. Because the time limit is so generous (8 hours), FB is a great option for longer streams.
You can save the video to your profile to people can see asynchronously, and you can also save it to your camera roll to preserve for posterity. One note: Facebook is not an archive; people see your posts basically the day you post it and that’s it. So if it’s a good video, you will want to save it and post it elsewhere for posterity (I tell you how, below).
Now, you can post publicly, or you can post privately to a group. So if you want to use FB to livestream, but manages who sees it (for example, you’re streaming to a group of students who have paid to have access to your online classes), you can easily manage those permissions.
The Summary
Time Limit: 4 seconds – 8 hours
Orientation: Landscape (horizontal – recommended) or portrait
Good for: Short or longer one-way videos that you want to livecast and save
Access: From computer or phone
How To:
Go to facebook.
Start a new
Click, “Live”
Turn your phone into the orientation you want (I recommend landscape – horizontal, rather than portrait – vertical). It looks better in your post if it’s landscape.
Click “Start Live Video.”
In bottom right corner, click “Finish” when you’re done. Try not to be awkward.
Publish:
To save to your own camera roll, click the download button.
Make sure that “Post video to your timeline” is checked.
Then click “Share”
Ta da!
Easy. It will take while to process. Facebook will let you know when it’s done. You can click the three little buttons in the upper right hand corner of the post to edit.
2. Instagram Live – Stories
With Instagram, you can post live via your Stories. However, because IG Stories shoot in 15 second chunks, this platform is better for shorter conversations (I like a minute or two). Theoretically, you could have a really long video in there, but I don’t think it’s the right platform for that kind of duration.
Like Facebook, Instagram story lives are not an archive; people see your posts basically the day you post it and that’s it unless they scroll. So if it’s a good video, you will want to save it and post it elsewhere for posterity (I tell you how, below).
The Summary:
Time Limit: 1-15 second blocks, but you can have as many blocks as you like
Shooting Orientation: Portrait (vertical)
Good for shorter one-way videos, under a couple of minutes
Access: from phone
How To:
Open Instagram Profile page
Click on your profile picture to open “Stories”
At bottom of page, slide left to “Live”
Before you do anything, click the settings button in upper left corner to make sure “Save To Camera Roll” is checked (I recommend also “Saving to Archive” so you add them to highlights later if you wish)
Click the big circle button at the bottom of your screen to start recording.
Click “End” in upper right hand corner to stop.
Click “Share to Story” at bottom (or delete)
A note on the recording time: Instagram Stories are broken into 15 second clips. When someone watches your story, they will run together sequentially as if there is no break. So you can talk for as long as you like, but if you want to do any editing of your clips (color correcting or adding hashtags), you will have to edit each segment separately. It’s easy to do, but may be tedious if you decided to chat for 3 minutes (you’d have 12 clips to edit).
3. Zoom
My fave “third party” for streaming is Zoom. Tried and true, and used by organizations everywhere. Unlike Facebook or Instagram, you would use Zoom to stream to a specific group of invited individuals. However, you could still post the video later onto your social media streams if you wished.
With the free version of Zoom, you can 100 participants for up to 40 minutes. For longer (or more people), you’d have to pay if you want access for more than 40 continuous minutes. Prices are reasonable.
Some Zoom perks:
You can record the sessions and post them later.
You can record the whole group if you’re doing a discussion (the video will record whoever is talking) or you can “pin” your video to just you (which I would recommend if you’re streaming a class or don’t want to record participants).
You can also screen share with Zoom. While this feature is not so important if you’re streaming a class, it is perhaps important for webinars, etc..
Another perk of Zoom: unlike Facebook, Instagram, or Skype, you don’t have join Zoom to attend a Zoom meeting.
The Summary:
Time Limit: 40 minutes with free (for $15/month, you can have 24 hour duration)
Shooting Orientation: Landscape
Good for longer videos that you want to save, or live streaming to a select group
Access: from computer or phone (I recommend computer, feels a little easier to manage)
Go to zoom, and download for your desktop. You can create and schedule meetings, invite others to your meeting, and record your live cast for posterity. A rough guide “how to” is below.
How To:
Go to zoom.com, then download and install to your computer.
Open Zoom.
Ensure your audio and video are working from your computer through your preferences and settings.
Create a meeting and invite folks to attend.
At the time of your meeting, you can either livestream with everyone visible and audible; if you are running a session that is one-way (ie: you’re teaching a class) where you want your audience invisible or muted, then you may choose to “pin” your own video so it’s the only one visible, turn off everyone else’s video, and mute other participants. They will still be able to participate in the chat.
You can pause the recording as you go.
Click “Stop” to stop recording.
Click “End meeting” to stop the meeting.
Zoom will process and save the meeting recording to your computer.
4 & 5. Skype and Google Hangouts
These apps are free, and relatively easy to use. I’m grouping Skype and Google Hangouts together as – at least to me – they seem similarly limited in scope. They’re free, and both of them are good for conference calling and screensharing. However, participants need to be a member of these respective host sites to join a meeting on them.
With Skype, you have up to 50 people on a call, you can record the call and you can mute participants. However, I did not find an intuitive way to edit how the video was recorded so that you capture only the host. While this is okay for an educational broadcast, it’s awkward if you want to record and replay a live class stream.
On Google Hangouts, you can have up to 25 people on a video call. However, you can only record your calls if you have the Enterprise edition of a Google Suite. Also, when you record, it will record visible active participants (“pinning” a participant won’t impact how it’s recorded).
While Skype and Google Hangouts are useful for small group or 1-1 meetings, they fall short if you want to record your meeting for posterity.
A caveat: while you can screen record anything that you play on your computer with a third party app, this isn’t a great idea for two reasons: 1. it’s illegal in many places to record people without their knowledge, and 2. screen capturing can deliver bad audio. If you want to record a session, I think it’s generally better to use a service like Zoom that is more geared to conferencing and recording.
Final Word
Options out there for screencasting, livecasting, and recording are always developing. These are several common tools that are familiar to many people and your participants. If you have any faves that you want to share, please list them below.
If you’re like me, the idea of marketing gives me an anxiety attack. Facebook Ads, Instagram posts, Webinars, SEO, and email marketing…it all starts to feel overwhelming and, well, inauthentic. But at the same time, we must navigate this jungle of self-promotion in order to thrive in our yoga businesses.
Yogis, it’s time to demystify marketing and get back to the basics. Here’s how I define marketing:
Marketing: how you find and connect with your people.
It’s that simple. Let’s look at the two steps that will help you get to the heart of the marketing matter.
1. Identify your people.
When asked, “Who do you want to teach?” we invariably say, “Everyone!” While this is big hearted, you will never thrive (as a person, let alone as a business!) by becoming a watered down milquetoast version of yourself. I don’t want you to appeal to everyone; I want you to appeal ONLY to your tribe. Becoming specific about your “target audience” will set you on a path of finding the folks who are singing the song that’s in your heart. These the people who will truly benefit from your offerings, and appreciate your offering. (And if you need some help identifying your true, personalized yoga mission, check out my post “Business Tips For Yogis: Know Thyself,” which helps you clarify your yoga path.)
What this means:
you may lose followers before you gain them
some people will actively dislike what you’re doing
you may no longer fit into your current studio situation or culture
you may need to change your branding, etc in order to more authentically come into who you are
you will be playing the long game.
When you get clear about your tribe, you are playing the long game. This means that you’re not picking up followers just to get likes or seem popular in the short term; you are dedicated to walking a path and creating long-term community based on your deepest truth. It won’t happen fast; but when you are really living your values, it will happen sustainably.
You don’t need to woo the world; you only need (as some brilliant marketer said) 100 true fans. If you have 100 people in your tribe who are willing to pay $500/year for what you do, you’re halfway to earning a six figure salary. All while being authentic to yourself and providing true value. It’s that straight forward.
2. Find & Connect With Your People
Now that you know who your people are, it’s time to figure out where they are. Generally speaking…
Are they under 20? Snapchat.
Are they under 40? Instagram.
Are they over 40? Facebook.
But friends, it’s not all about social media. Think about where your people like to connect:
Local haunts (coffee shops, wellness practitioners)
Yoga studios (the students in front of you are your best marketing friends!)
Cafes
Reading blogs
Listening to podcasts
Watching webinars
Journals, magazines, newspapers, periodicals
Retreat centers
Organizations and memberships
Online groups, communities
Etc.
How can you share what you are doing in these contexts in order to connect with the folks that will benefit from what you are offering? Look for win-win relationships where you can share what you do with the people who really need it.
And here’s the thing: marketing starts with you telling people what you’re up to. I can’t tell you how many times I see teachers fail to announce retreats or workshops in their classes (or fail to tell their friends) because they feel self-conscious. In order for people to find you, they have to first hear about you. Which means – I know it’s scary! – opening your mouth and letting people know. If you are feeling shy about self-promotion, get out of your own way by connecting to the value of what you are offering and sharing from a true attitude of service.
Your task: determine two marketing channels that you can use where you can find your people. And identify two people in your current network where you could create a win-win situation and develop some mutual support.
Here’s the news, yoga teachers: your career doesn’t have to look like anyone else’s.
We often think that our yoga career must look a certain way in order to be “successful.” Shouldn’t we be like Rachel Brathen or Shiva Rea, and have 100,000 followers, be labelled an influencer, produce online classes, and jetset the world?
Yogis, no. Please let me take that burden off your shoulders.
Here’s the thing: your yoga career should serve your life, not be your life.
Your yoga career should serve your life, not be your life.
All too often, the pleasure and joy that we take in the actual practice of yoga is thwarted by the business itself. We think that we have to fit into a one sized fits all mold and teach 25+ classes a week, become a Lululemon ambassador, and teach workshops in order to live the yoga dream. In our zeal to make it happen, we may neglect our own practice, scrambling to make ends meet, and burn out.
It’s time to step back and do something differently.
Break The Mold
As a way of illustration, I want to share with you a few stories about some friends of mine who have made yoga a part of their lives, but each in a different way.
Case #1: Gretchen
My friend Gretchen is an incredibly popular yoga teacher. She teaches group classes and is faculty in teacher trainings because she likes the person to person contact. Although she has been asked to run a studio, she is not at all interested in moving up to ownership, because her joy comes from connecting directly with her students. To make her life sustainable, she has kept a part time consulting job so that yoga can be a source of joy rather than stress.
Case #2: Andres
Andres works full time as the social media arm of a yoga studio. Although he has taken his teacher training, he doesn’t teach, but instead practices yoga a lot and uses his considerable marketing skills to support a studio that he loves.
Case #3: Maggie
Maggie loves to travel. Her exclusive focus has become facilitating and teaching yoga retreats. Not only does she run her own retreats, but she collaborates with retreat companies to offer exceptional experiences around the world.
Case #4: Amanda
Amanda is your classic full time yoga teacher. She teaches full time (over 25 classes/week), is an ambassador for several yoga brands, and runs workshops. She thrives on the hustle.
Case #5: Marco
Marco created an online yoga site and is now living out his mission to provide free yoga to the world. While he had to put in a lot of time and effort to get his business off the ground, now his work is paying off.
Case #6: Me
Except for a two month stint, I have never taught yoga “full-time.” My sweet spot is about 6 classes per week. I teach teacher trainings, write books and articles, and help studios and teachers around the world develop their business and their teacher trainings. I thrive teaching and helping others to grow.
Case #7: Fatima
Fatima is a studio owner and yoga teacher. She loves building systems, community, and managing people to be their best. Although she put in a lot of time for the first five years, she’s finally in a place where she can begin to delegate more of the day to day.
Time To Thrive
What do all these folks have in common?
Yoga is serving their lives.
We each get our “happy” in different ways. “Thriving” in our yoga business is not simply about making money, it’s about finding the way in which yoga can serve the expression of your core values and your personal mission. For some, yoga serves a core values through building community. For others, it’s promoting wellness. For others, it’s travel.
So here are your questions to ponder:
How does your yoga practice serve your life?
How does your yoga teaching serve your life?
In what contexts do you thrive?
What do you need to change so that your yoga business can fulfill you more?
If you need to get back to your core values, check out this excellent Mission Worksheet.
If
you want to make yoga your full time passion and career, I recommend you to
start slowly. If you have a steady job, do not just up and quit and expect to
make a living from teaching from day one. People need to get to know and trust
you and that usually takes some time. See if you can reduce the amount of
working hours at your main job and start offering a few yoga classes before or
after work. In this way you will still have an income if there are not too many
people showing up for your yoga classes in the beginning, and you will not feel
the pressure of having to succeed at once in order to be able to pay your rent
or mortgage.
I know enough yoga teachers who have either burned out (myself included) or are close to it because they teach so many classes every day that they hardly have time for their own practice anymore just to generate some income.
Once you have built a bigger community which stays with you and recommends you to other people, you can think about quitting your job and going full time with yoga. It helps to do workshops at different studios, to blog, also as a guest blogger for other websites, to write a book, even if it is a smaller e-book which you can give away online or to produce videos so you can get a greater outreach.
In the times of self-publishing and Internet, it has never been easier to get your message across. Just have some patience and do not rush into your full-time yoga business. It sure does take some time, especially if you plan to open your own studio. I started my own studio and it took some time to get a steady flow happening, and I had to make some adjustments along the way. We learn so much from our experiences, the positive ones and especially the ones that really help us see things in a new light. It took patience, support from my family and a wonderful community of yoga enthusiasts, but a few years later I was more than happy that I stayed with my dream. It took stamina, persistence and a willingness to be with what was until my studio took off, but it did and today I am enjoying my full time passion offering Yin Yoga teacher trainings!
When
I opened up my yoga studio many years ago, I expected the people to come to my
classes in masses because there was no other yoga studio around. However much
to my surprise, there were only a few people who came. Wow, how disappointing!
It seemed like the others were skeptical about this new thing and had no idea
what yoga was.
In the beginning there were quite a few classes where I only had one or two students show up. I questioned myself and had lots of doubts about my idea of opening up a yoga studio. At that point I was offering all kinds of classes: Yoga for kids, Yoga for seniors, Yoga for pregnancy, Yoga for beginners, Ashtanga Yoga, Vinyasa Yoga, Power Yoga and so on… and still only few people came.
Starting
a yoga studio required lots of time and I was working hard, doing all I could
to find a way to bring the community yoga classes because I knew that they were
very helpful in many ways. I would prepare for several classes and saw pretty
quickly that it was not worth all the effort, which was disheartening to say
the least! Instead of closing down and abandoning my vision for a yoga studio,
I decided to narrow my classes to just a few different styles, reduced the
amount of classes and stayed patient. After about six months, the classes slowly
started to fill. Two years later all of my classes were packed, and I’m very
thankful to say that those early students stayed and practiced with me for many
years.
I
was so glad that I did not give up early because one never knows when success
is going to come, it might be just around the corner. I felt grateful for this
experience because in this way I could slowly grow as a yoga teacher and had
many important experiences because I was working very closely with the people
who came to my classes.
Once I specialized on one topic, which was Yin Yoga in my case, people came from all over the country to my teacher trainings. Of course, it was helpful that I wrote several books about it and produced DVDs at a time when there was no Yin Yoga in Germany. Eventually I knew without any doubts that I had found my niche.
It takes courage to stick with our dreams and visions when we don’t see an immediate response—and that’s hard—because we do not know if there will be enough people who like what we are doing—but again, how will you know if you don’t give your dreams a try?
What
was most important to me was to be authentic. I realized that I did not feel
authentic with some of the styles of yoga I had been offering, but once I
focused on Yin Yoga—which I felt absolutely comfortable with—the waiting lists
for my trainings got longer and longer.
Therefore I recommend that you ask yourself what feels right to you: what can you really feel in the depth of your heart? And once you find that, stay authentic and bring it out to the world. Surely there will be enough people who were waiting exactly for this!
I took up yoga whilst at university studying economics and management. If you’d told 18-year-old me that six months after graduation I’d have my own yoga studio, I certainly wouldn’t have believed you.
It’s been a tough journey to where we are now. From delays with planning permissions (causing us to nearly lose our space) to problems with the heaters (for hot yoga) being delivered, we had to continually innovate solutions to overcome obstacles. Like fitting our new heaters into the studio at 10 pm the night before our opening day.
As a result of delays, we had to push back our opening to November, which is not the best time to be starting in the fitness industry. When we started, attendance was very quiet. I was filled with doubts and worried that I’d made a big mistake.
After opening, we were still on a steep learning curve. I had to learn a lot of new things, like creating my own website, marketing to get people through the doors, electrical wiring, just to name a few! We also weathered some literal storms as well, like storm Emma (AKA The Beast from the East!).
At first, I took it to heart when students didn’t come back. The financial questions were always running in my head, and self-doubt was creeping in.
If you are a new studio owner, you have to get comfortable being out of your comfort zone (like when no one shows up!). You also have to find ways to spread the word. To get some initial buzz, I took out an ad in the local paper, created flyers, created social profiles on Facebook and Instagram and signed with a digital marketing agency to provide SEO and PPC services on a monthly basis. Social Media and the agency probably had the biggest impact. After we survived our quiet period, we hit the New Year. As the new year’s resolutions kicked in, word of mouth began to spread.
Fast forward to today, and Firefly Yoga has been open for just under two years now and business is growing strong. I wouldn’t change the journey getting here for the world and feel like I have the best job in the world.
One of the things that I credit our success to is that we have focused on building community.
Here’s what helped me get here.
1. Create a warm and welcoming environment
The vibe of your studio is so important. At Firefly Yoga, we have soft lighting and padded flooring, which creates a relaxed and comfortable environment. Because we are a hot studio, I can always keep the studio nice and cosy on a winter’s day. Creating a relaxing, homey environment will allow your students to feel comfortable and welcome.
And you must keep your studio clean and tidy. If you are a smaller studio working on your own, then create tidy up routine that you do every day once the last class has finished. Teaching your students to help pack their own props is also helpful.
2. Separate your yoga and check-in space
Having a check in area separate from your class space provides a general meeting point where students can meet, talk, and connect before classes. It gives your students a place to speak more freely, whether it’s about me, other classes they enjoy, or just general life stuff. I always open up 30-45 minutes before my classes start to allow my students this time to chill and chat with each other.
It’s great seeing them all talking to each other, I always feel guilty when I have to shush them so we can start!
3. Create a relaxed class atmosphere
While I know it won’t be for all teachers, allowing for a relaxed, casual, and non-judgmental class atmosphere feels very authentic to me and helps create a feeling of connection. I don’t require silence while we practice; instead, I encourage students to ask questions throughout the class rather than waiting until the end. We also laugh while we practice.
This laid-back atmosphere allows students to be themselves. (It’s great because I can be myself as well!) Once you have that trust and feeling of community, it allows the group to really connect with one another.
4. Show off your community!
Again, this may not be for everyone, and it will depend if your students would be up for a bit of fun!
We recently held our first Real Yogis photoshoot. This was a great day that strengthened and built new relationships with my students.
Students volunteered to come in for an hour and be part of the photoshoot. (Make sure to get their written approval!) We did some yoga poses, had some photos taken and then finished with tea and cupcakes.
I’ve now got these photos all over my website and will be able to share them on social media. It’s great to have your own images as well rather than stock ones. When the people who come to the studio see themselves on social media, I think it makes them feel even more a part of the studio.
5. Organize Events
A great way to solidify your community is to build relationships outside of the studio. Both yoga and non-yoga events are a great way for students to enjoy spending time with their yoga friends in a different setting.
I recently held our first Firefly Yoga retreat, with the intention of providing a new experience for students and build on our studio relationships. As it was our first ever retreat I offered it at cost price for the students. They were my yoga retreat guinea pigs!
To minimize our risk, I chose a venue with a good sized function room for the yoga and lots of different sized properties for people to stay in. This allowed us to build up numbers of attendees slowly. It also meant we didn’t need to fill a say 30 person property to be able to go.
The retreat helped solidify existing relationships and create new ones between students who went to different classes. It was also quite the talk of my classes for the next week after we got back, and created conversation with about where the next one was going to be!
I also organized a Firefly Yoga Christmas meal last December which was a great success and a really nice opportunity to get to know people better. Other options could be pot luck dinners or post-class gatherings: whatever works for your community.
6. Learn your students’ names
This sounds simple, but it goes a long way! I see around 250 students a week and take pride in the fact that I know all their names. Not to say I don’t occasionally have mind blanks like everyone else! This makes them feel special and appreciated, and who doesn’t want that?!
7. Take an interest in your students as people
Take an interest in what your students tell you about themselves.
If they tell you about an upcoming holiday, ask them how it was when they get back. It can sometimes be hard to keep track of everyone’s movements, but when you have regulars you’ll start to notice when they aren’t around. Even casually asking, “Oh, I didn’t see you last week, have you been away, is everything alright?” will open the door to conversation and show them that you care.
I may not always remember the exact location they have been on holiday for example, but bringing it up will still show that I’m taking an interest in their lives outside the studio and helps them feel valued.
A caveat: you will also have students who seem to prefer not sharing about their lives, in which case I don’t pry.
8. Be relatable
Last but not least, be relatable.
Just as students wil share snippets of their lives with you, share a bit of your life with them. For example, I recently shared some pictures of my wedding on the studio Facebook page. If I have a weekend off, I always share what I’ll be up while the studio is closed. I make sure to show that I a real person too. For example, I’ll share blooper videos of myself practicing poses that didn’t quite go as planned!
By being relatable, I help us all to relate from a human – rather than just transactional – space, which helps to foster connection.
Good Luck!
I hope you find these tips useful and inspiring. If you use any of the ideas, I would love to hear how it went! If you have any other ideas. please share them in the comments below.
According to yogic texts, humans have a system of over 72,000 nadis, or energy channels, that flow throughout the body. These channels are not visible to the human eye, and encompass a bustling network of moving information through our system.
When the nadis, which translate into “channels” or “flow,” are open, energy flows freely — and our systems are healthy.
When the nadis are blocked, energy becomes stagnant and we experience physical and mental discomfort.
This dynamic energetic process, which is currently taking place in our bodies, is exactly like the process of marketing your business. Like the energy in your body, your marketing is most effective when it has several clear, open channels for energy, or information, to flow through consistently.
Marketing is simply sending a message through a channel.
Marketing, like the nadis, is a system of channels, or freeways, that carry information from a source to a destination.
Effective marketing is like cars moving freely on a freeway with no traffic.
Ineffective marketing is like a traffic jam where cars are stuck in place.
In other words, rather than thinking of marketing as a practice that is “good or bad,” instead think of marketing as a system of channels carrying information at varying speeds.
Using this framework, the first question to ask yourself as a business owner looking to expand your business is, “which channels are currently open, and flowing easily?”
Your channels are the ways people find you.
The number of channels you have opened will determine the ways that your customer can receive your message and decide whether to buy something from you.
Marketing channels are information gateways like Instagram, email marketing, and events. They are opportunities for you (the source) to send a message (the solution your business offers) to a destination (your customer).
Business owners may feel discouraged about their sales, but if they only have two or three marketing channels open and those channels have “bad energy flow,” then they must evaluate what’s obstructing the flow of those channels, and decide if it’s worth opening new ones.
Assuming your message is clear and that you’ve targeted the right customer, marketing channels can deliver your business’ solution quickly and directly to solve your customers’ problem.
Choosing the right channels.
Let’s say you are a nutritionist, and you host an in-person workshop about gluten-free meal planning.
In the workshop, you reference recipes from your gluten-free cookbook that help people with the problem of preparing gluten-free meals ahead of time.
Let’s say that after the workshop, you sell a cookbook to all 15 attendees.
In this instance, the marketing channel of a workshop demonstrates fast energy flow for your business because it easily allows the solution that you offer to flow to the problem that the customers have, through the nadi, or channel, of the workshop.
Let’s say that you are meditation teacher, and you create a single post on Facebook about a digital meditation course that you are selling.
Forty-eight hours after you posted about your meditation course, you’ve gotten ten likes, two comments, and zero sales.
In this instance, the marketing channel of a Facebook post demonstrates slow energy flow for your business, likely because the millions of other posts and ads about meditation on Facebook are like a traffic jam slowing down the ability for your solution (a meditation course) to reach its destination (a stressed person looking for ways to relieve anxiety.)
While this example is not to suggest that you should prioritize workshops over Facebook posts, it is an invitation for you to evaluate the speed through which energy flows from you to your prospective customers.
Practice yoga for your marketing channels.
Energy flow in our bodies is improved by the practice of yoga. When you practice yoga, you breathe deeper and infuse the nadi system with more prana, also known as life force energy.
I think of life force energy as life momentum. It’s a universal momentum that makes the seasons change, the flowers grow, and the planets orbit. It’s the same momentum that propels you out of bed each day and catapults you into your desk chair, eager to build your business.
Just as you can build prana in your own body through the practice of yoga, you can also infuse more prana into your marketing channels focused mindfulness. This doesn’t mean doing poses on your mat while making a Facebook post; it means being present and conscious as if you were doing yoga while you do your marketing.
With a yogic level of awareness and presence in your content creation, you will likely consistently craft posts that speak directly to your ideal customer, convey your message clearly, and fit in to your overall strategy.
This level of presence is what infuses your marketing channels with the energy that helps you to find your clients easily.
As a best practice, only open marketing channels that you feel consciously excited to work on. Whether it be email marketing, workshops, or YouTube videos, choose channels where you will be inspired to inject the necessary prana to lovingly reach your target audience.
Create time to nourish your marketing.
Being conscious in marketing means treating marketing with the same care as you would your yoga practice.
Just as you carve out time for your yoga practice, you can carve out time to work on marketing.
In yoga, you can only do one pose at time, and in marketing, you can only do one task at a time.
On your mat, you practice observing distractions and not engaging with them, just as you can at your desk.
Most of all, being compassionate, non-judgmental, and joyful during the process of marketing like you are in yoga is the key to creating energetically charged content.
Marketing is a practice.
There are plenty of other variables to consider when it comes to a successful conscious marketing strategy.
Looking at marketing through the lens of the nadi system is simply a reminder to be aware of the channels that you’re working with, and to remember that the remedy for any slow-moving marketing channel is more energy.
Ultimately, remember that marketing is a way of strategically using a channel to share a solution with people who have a problem, and that doing this process effectively is simply a faster way of helping people.
I’m not a fan of the way that we use the word work.
“I’m going to work,” “I’m going to get some work done,” “how’s work?”
These are common phrases we use daily to refer to the activities that we do with the intention of generating income, or other desirable results. The word work is defined: “activity involving mental or physical effort done in order to achieve a purpose or result.” I take issue with the latter part of the definition, which is to achieve a purpose or result. When we consider activities work, we take the focus away from the process of the activity, and fixate on the purpose or result.
By contrast, the definition of the word play is defined, “to engage in activity for enjoyment and recreation rather than a serious or practical purpose.” While the purpose or result is an important motivator for getting us to the “activity,” I’ve found that the best way to actually enjoy an activity that achieves a purpose or result is (paradoxically) to completely detach from the purpose or result, which, by definition, turns the activity into play.
In other words, instead of sitting down at your desk and immediately thinking about the pay check, promotion, or praise from a client or boss as motivation for plowing through your to-do list, the key to turning work into play is to find ways to make the process of the activities on your list more enjoyable.
We think of work and play as opposites, and by definition they are. However, as I experiment with my activities as a business owner, I find that that the more that I find ways to enjoy them as if they are play, the more easily, and enjoyably, I can arrive at my intended result.
Here are three tips for turning work into play.
1. Plan out tomorrow, today.
When you sit down at your desk to work and haven’t taken the time to organize your list of activities, your valuable creative energy and decision-making goes to solving the problem of, “What do I need to do?” instead of “How can I make this activity more enjoyable?”
Make your to-do list for your day the night before. Make your list chronological and assign rough estimates for what time you’ll start and how long it will take, so when you sit down to work, you know exactly what activity you’re going to do first, and approximately how long you will spend working on it.
I like to outline my schedule on iCal, beginning with when I’m going to wake up. I schedule both personal activities (like my meditation time, breakfast, pleasure reading, and walks) as well as specific professional activities (writing articles, answering emails, brainstorming, and doing bookkeeping).
If you decide, for example, that your first activity tomorrow is going to be bookkeeping at 9AM, you can get creative about the ways of making the process of bookkeeping as fun as possible.
Bookkeeping? Fun? You may think those words should never reside in the same sentence. Bookkeeping is often cited as one of the most dreaded tasks by entrepreneurs. However, I worked with an amazing accountant who helped me come up with a “bookkeeping ritual” that I do on the first of each month, and now I’ve come to really enjoy the process. (Read on to find out how!)
2. Make your activities a multisensory experience.
Before I sit down to do bookkeeping, I make sure my workspace is very tidy. This contributes to peace of mind, and also takes away the option of cleaning any clutter instead of doing the activity I’ve intended (which I rationalize doing often.)
I meditate right before doing bookkeeping, and put on some relaxing music (I’m loving this Meditative Mind station on YouTube) and prepare a cup of coffee or tea to enjoy while complete this activity.
After meditating, I light a candle or some incense, and then sit down at my desk. Burning something helps create an ambience that reminds you of the activity you’re working on, and keeps you focused.
I have all windows on my computer closed (except for my bookkeeping software) and emails and texts on Do Not Disturb.
Before starting the activity of bookkeeping,I take a few minutes to journal. I write out anything, personal or professional, that’s bothering me, with the intention of letting my journal “hold” the thoughts for me while I get things done.
I think of journaling for business as having a mud room for your thoughts. Keep the thoughts in a separate “room” from your creativity so you don’t track the mud of distraction into your work…or play.
I then set a timer for thirty minutes (I like to use the bells on Insight Timer, which are the same bells I use for meditation) and get started with categorizing expenses, looking at my income, and tracking my monthly goals.
This may sound like a lot of song and dance before sitting down to get things done, but I’ve found that doing this intentional sequence of multi-sensory practices before something tedious is actually the fastest way to get it done, and most enjoyable.
Using all of your senses while you work on your activities keeps you present – and play only occurs in the present. Our senses are related to things happening in the moment, so by having pleasant sounds, smells, tastes, and a tidy environment readily available, you more easily stay in the moment.
3. Acknowledge all of the activities you complete in a day.
When I make an effort to optimize the process of bookkeeping, I fly through the four-step process I created, and actually enjoy the experience.
At a different point in my business, I would sit down at my desk, haphazardly make a list of to-dos, and jump between them frantically.
I would start an activity like bookkeeping, get frustrated, go on social media, curse everyone I followed, go back to bookkeeping, get frustrated again, start reading financial blogs, go back on social media, and continue similar cycles until about 5PM when I would reach a level of despondency and then storm out the door to go sulk on my yoga mat.
I’m learning that today’s planning determines tomorrow’s success, and that scheduling your days ahead of time gives you the chance to turn your activities into experiences, instead of labor.
A small shift I’ve made to even further enjoy the process is to quickly list everything I’ve accomplished at the end of my workday. Emotions like anxiety surface when we mentally exaggerate thoughts like, “I got nothing done,” “I can’t focus,” or “I’m not making progress.”
Making a list of everything you’ve accomplished, even if it wasn’t everything you scheduled, is a great anti-anxiety mechanism, much like the process of building a sandcastle and taking a step back to admire it.
Sure, the tides will wash it away overnight and you’ll have to start over tomorrow — but taking a moment to bask in its glory reminds us that in some ways, all we’re doing is building sandcastles each day. So best to enjoy the playtime.
Being a professional yoga teacher is hard work, and much of that work takes place outside the classroom. To have career longevity, you must develop good working skills with your studio management.
I have spent fifteen years managing yoga teachers at three different multi-location companies. I’ve auditioned teachers, hired them, had performance conversations, managed their subs, reviewed their classes, changed their schedule, and – occasionally – fired them. And I’ve also been on the other side of the fence, and been a yoga teacher for hire at a wide range of studios.
I wrote a post awhile back on “How Yoga Studios Can Keep Their Teachers Happy.” When it came out, one of my friends – a studio manager – sighed and said to me, “You know, Rachel, we love our teachers…but they can drive us absolutely crazy too. Some are so hard to work with. Can you write a post on that?”
Here are five tips to for being a professional yoga teacher and keeping your relationship with your studio in top form.
1. Be Your Own CEO
Yoga may still smell a little bit of the 1960’s hippie counter culture that brought it over to North America, but it is now big business. And if you want to create a yoga career with longevity, you have to take yourself seriously. As one of my friends advises, “Don’t be a flakey hippie.” I’ll offer more specific pieces of advice below, but “Be Your Own CEO” is the essential idea. Take your career as seriously as you would if you were working at a bank, a hospital or a law firm.
The more you treat yourself like a professional, the more you will uphold your own sense of integrity, and ultimately, the more professionally that you will be treated.
2. Don’t Sub Out Classes For Silly Reasons
Managing subs is one of the most time consuming tasks a studio faces.
Now, everyone needs to sub out classes occasionally; it’s completely understandable if you’ve come down with the flu or need to take your friend to the hospital. However, it’s very hard on the studio when a teacher subs out frequently or at the last minute. Subbing out classes undermines the studio experience and the teacher’s ability to build community. When a teacher subs out their class, it sends a message to the student that 1. you don’t care, and 2. consistency doesn’t matter. If the teacher doesn’t bother showing up every time, why should they? If you want to build your classes and reputation, then you must show up.
Depending on your studio’s subbing protocol, either you or your studio will be finding your sub. Either way, a last minute sub is disruptive. If the studio is finding a sub for you, then they have to drop everything in order to find a replacement. They will be very stressed out and it will take away from their time to do other work. At a smaller studio, your inability to show up may mean that the studio manager or owner has to step in and teach, which will likely throw their life plans into disarray (trust me, you don’t want to be the one to ruin “date night”). Even if you are finding your own sub, they still usually have to update the website, track the change, and deal with disgruntled students.
Managers aren’t usually jerks; they want to help their teachers out when it’s a real emergency. But if you cry wolf and sub out your classes when (forgive me, but these are real excuses I’ve heard), “the moon is in retrograde,” “it’s such a nice day,” or “I just got mad, free tickets to this concert,” then you are undermining your own professionalism, your community, and the financial success of the studio. Over time, this will not be sustainable.
3. Do The Professional Things
When you treat yourself as a professional business owner, you will do the other things that support your business besides just teaching. This may include:
Invoicing accurately and on time,
Communicating professionally,
Showing up at community events,
Upholding studio policies,
Not talking smack about the studio to students,
Leaving your personal life at the door,
Being kind and courteous to other staff,
Helping maintain the yoga space (neatening up blocks, blankets, and keeping things nice),
Being a studio ambassador: know about studio events (sales, workshops) and understand the passes that students may purchase.
4. Be Of Service
Teaching a class isn’t about the 60 minutes of class time for which you are scheduled; it also includes 15 minutes before and after your class in which you can connect with your community, set the class up for success, and answer questions. Don’t be the yoga “rock star” who breezes in, plops down, and just starts teaching. Show up early and stay late. Take time to get to know your students. I know that sometimes we have to hold space and run the teaching show, but remember that the class experience is not about us. It’s about them.
5. Be A Team Player
I know it’s challenging to feel like you’re part of a team when you are a contractor. Understanding the challenges that come from running a yoga studio can give you context on why you may paid what you are paid, and how to have conversations around your own needs, even when they are difficult.
Respect and professionalism go both ways: when you take your own yoga career seriously, treat your studio with respect, and show up as a professional, you will open the doorway to having the open and courteous conversations that are important to you. For example, conversations around changing your schedule, taking time off, or getting a raise. When you have shown the studio that you care about the success of the community and upholding the standards of the business, they will be more receptive to working with you when your needs are at stake.
One Caveat
Not all studios are created equal, and not all studio owners are great managers. If you feel that you are in a position where the studio owner lacks integrity or professionalism, you may choose to quit. Make your exit as graceful as possible. The best practice is to give the studio owner lots of notice (a month is ideal). Even if the studio isn’t upholding their professionalism, you can uphold yours, which will give you a deeper sense of your own professional worth.
Lisa is frustrated because she hasn’t been able to get her first yoga retreat scheduled yet. She keeps committing to new announcement dates, but says she hasn’t had the time to actually book the trip.
In reality, it’s not time holding Lisa back: it’s her resistance to confronting her fear.
Have you been saying you want to expand your business or take specific actions, yet still find yourself standing in the same place? If the answer is yes, you may unknowingly be letting fear stop you from achieving your goals and dreams.
Fear is inevitable. You can either let it stop you or use it to propel you forward. I promise you will never do anything great without pushing through fear!
What are you most afraid of? Do any of these resonate?
Building your career
Dealing with money
Raising your standards
Making a commitment
Making decisions
Saying no
Envisioning a different future
What is fear?
Fear comes from experiencing something outside of our comfort zone. It’s an emotion we experience when our mind contemplates CHANGE in the future– even if it’s for the better.
Where does fear come from?
As a child, you probably had some big dreams of what you wanted to be or do in your life. If you have been around children lately and listened to their conversations – they think big. They dream of being president, of flying to the moon, or becoming a world-class ballerina. Personally, at age 10 I was fully committed to becoming a Dallas Cowboy cheerleader! As we get older, the world seeps in and the more we listen, the bigger and more debilitating our fears become.
It’s important to know there is nothing wrong with feeling afraid.
If you are continually growing and stretching, fear will regularly come up. Fear is not the problem; it’s the way we deal with it that creates obstacles. Instead of fighting or ignoring fear, think about working with it.
Fear will only subside once you face it.
Yes, you will feel scared and it’s impossible to be fearless. You have to get comfortable being uncomfortable and not always knowing the answer or outcome.
Courage is not fearlessness.
Courage is simply the willingness to move forward fear and all. The better you are able to manage and push through fear and discomfort the greater the quality of your life and achievement of what you want will be.
You are not alone. Everyone is afraid sometimes.
When you see people who have succeeded and wonder why they weren’t afraid – most likely they were. The people that succeed in achieving their big dreams and goals just took action in spite of feeling fear.
Here’s where to start
The first step to shifting your relationship to fear is taking action. More specifically, it’s taking imperfect action. If you keep waiting to figure out the exact, most perfect way to start something – STOP. It’s not going to happen. You’re not going to be perfect and that’s OK. The road to success is paved with imperfect action. Don’t let fear stop you from living your dreams!
Food for thought
What would you do in your life if you weren’t afraid to fail?
I’d love to chat about it and help with a plan to get there. I offer complimentary, no obligation 30-minute coaching calls. Click here to schedule your complimentary session.
Teachers are the life blood of your yoga business. But they’re also one of your biggest expenses. So how do you keep yoga teachers happy? Check out these five strategies for keep the face of your business happy.
1. Be transparent about your costs
Look, the yoga business is not wildly profitable. Competition and costs make running a studio challenging. However, do your teachers know this? Chances are, if your teachers think you are raking in $25 per student head in their class, they’re going to get a little bent out of joint if you can’t give them a raise. A little information about real studio costs and teacher pay rates can go a long way. Let teachers in on the realities of running a studio (for instance, that you’re not earning $25 a head for a drop in, but more like $11). Honesty helps get everyone on the same team.
2. Be transparent about their prospects
In most careers, employees (or contractors) have a sense of their career path. Because of the nature of the business, yoga studios tend to be much more shady. Usually there is no clear pathway forward teachers earning a raise, but nebulous ideas about “generating community” and “abundance.” Be straight with your teachers about their prospects and give them tangible that they can strive for. “When you hit at least 18 people per class, Sharon, that’s our sweet spot.” Or, “We only have a few workshop spots this season, but we can talk about next year.” Find out what their goals are, and let them know what needs to happen in order for them to move forward.
3. Give them perks
Most yoga teachers love continuing education. Even if you can’t give them a high hourly rate, an easy way to create some love is to give your teachers discounts on visiting teachers and trainings. Your teachers get more training, your workshops have more people, your visitors feel popular, and you create some good vibes at your studio. Now, I know that your margins are tight, but do what you can. Give your teachers heavily discounted or (preferably) free classes at your studio. Nothing raises studio morale and community like when having teachers practice in class with their students.
4. Listen
It’s easy to get frustrated when teachers seem to complain. But listen carefully. Teachers are on the front lines of your business and interact very closely with your students and your studio space. They are your best eyes and ears. Studio not clean? Walls look dirty? Mats starting to smell? If you make it clear that you love an open dialogue, your teachers can give you valuable information that you might otherwise miss. Rather than taking feedback personally, treat your teachers like your own team of secret shoppers who can give you valuable intelligence on your business. Giving them a voice and helping them to feel valued will also go a long way to create good lines of communication and positive feelings.
5. Treat them like people, not commodities
A cornerstone of teacher happiness (indeed, any employee’s happiness) is feeling valued. Take a little time to connect with teachers one on one. Attend their classes – not to give feedback, but to simply show them that you value them as a teacher. When you do give feedback, make sure to lead with the positive and emphasize what you think they are doing well. Be proactive about acknowledging key teachers for their contributions. It’s very easy as a studio owner or manager to be focused on the business or – when you’re interacting with teachers – to focus on what needs to fixed and improved; make a special and proactive effort to share the positive stuff, too. A little personalized acknowledgment can go a very long way.